Practical Reverse Engineering Part 5 - Digging Through the Firmware
14 Dec 2016- Part 1: Hunting for Debug Ports
- Part 2: Scouting the Firmware
- Part 3: Following the Data
- Part 4: Dumping the Flash
- Part 5: Digging Through the Firmware
In part 4 we extracted the entire firmware from the router and decompressed it. As I explained then, you can often get most of the firmware directly from the manufacturer’s website: Firmware upgrade binaries often contain partial or entire filesystems, or even entire firmwares.
In this post we’re gonna dig through the firmware to find potentially interesting code, common vulnerabilities, etc.
I’m gonna explain some basic theory on the Linux architecture, disassembling
binaries, and other related concepts. Feel free to skip some of the parts
marked as [Theory]; the real hunt starts at ‘Looking for the Default WiFi
Password Generation Algorithm’. At the end of the day, we’re just: obtaining
source code in case we can use it, using grep and common sense to find
potentially interesting binaries, and disassembling them to find out how they
work.
One step at a time.
Gathering and Analysing Open Source Components
GPL Licenses - What They Are and What to Expect [Theory]
Linux, U-Boot and other tools used in this router are licensed under the General Public License. This license mandates that the source code for any binaries built with GPL’d projects must be made available to anyone who wants it.
Having access to all that source code can be a massive advantage during the reversing process. The kernel and the bootloader are particularly interesting, and not just to find security issues.
When hunting for GPL’d sources you can usually expect one of these scenarios:
- The code is freely available on the manufacturer’s website, nicely ordered and completely open to be tinkered with. For instance: apple products or the amazon echo
- The source code is available by request
- They send you an email with the sources you requested
- They ask you for “a reasonable amount” of money to ship you a CD with the sources
- They decide to (illegally) ignore your requests. If this happens to you, consider being nice over trying to get nasty.
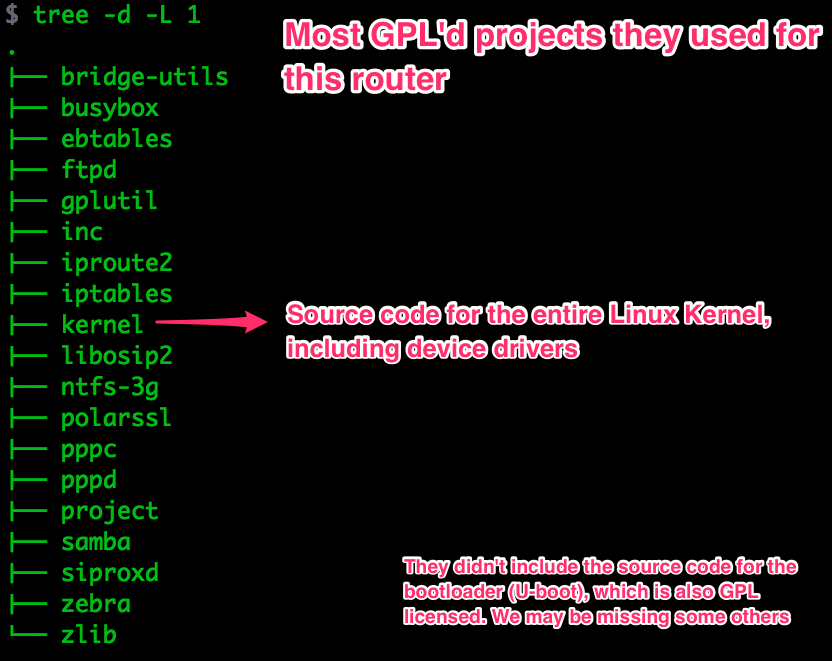
In the case of this router, the source code was available on their website, even though it was a huge pain in the ass to find; it took me a long time of manual and automated searching but I ended up finding it in the mobile version of the site:
But what if they’re hiding something!? How could we possibly tell whether the sources they gave us are the same they used to compile the production binaries?
Challenges of Binary Verification [Theory]
Theoretically, we could try to compile the source code ourselves and compare the resulting binary with the one we extracted from the device. In practice, that is extremely more complicated than it sounds.
The exact contents of the binary are strongly tied to the toolchain and overall environment they were compiled in. We could try to replicate the environment of the original developers, finding the exact same versions of everything they used, so we can obtain the same results. Unfortunately, most compilers are not built with output replicability in mind; even if we managed to find the exact same version of everything, details like timestamps, processor-specific optimizations or file paths would stop us from getting a byte-for-byte identical match.
If you’d like to read more about it, I can recommend this paper. The authors go through the challenges they had to overcome in order to verify that the official binary releases of the application ‘TrueCrypt’ were not backdoored.
Introduction to the Architecture of Linux [Theory]
In multiple parts of the series, we’ve discussed the different components found in the firmware: bootloader, kernel, filesystem and some protected memory to store configuration data. In order to know where to look for what, it’s important to understand the overall architecture of the system. Let’s quickly review this device’s:
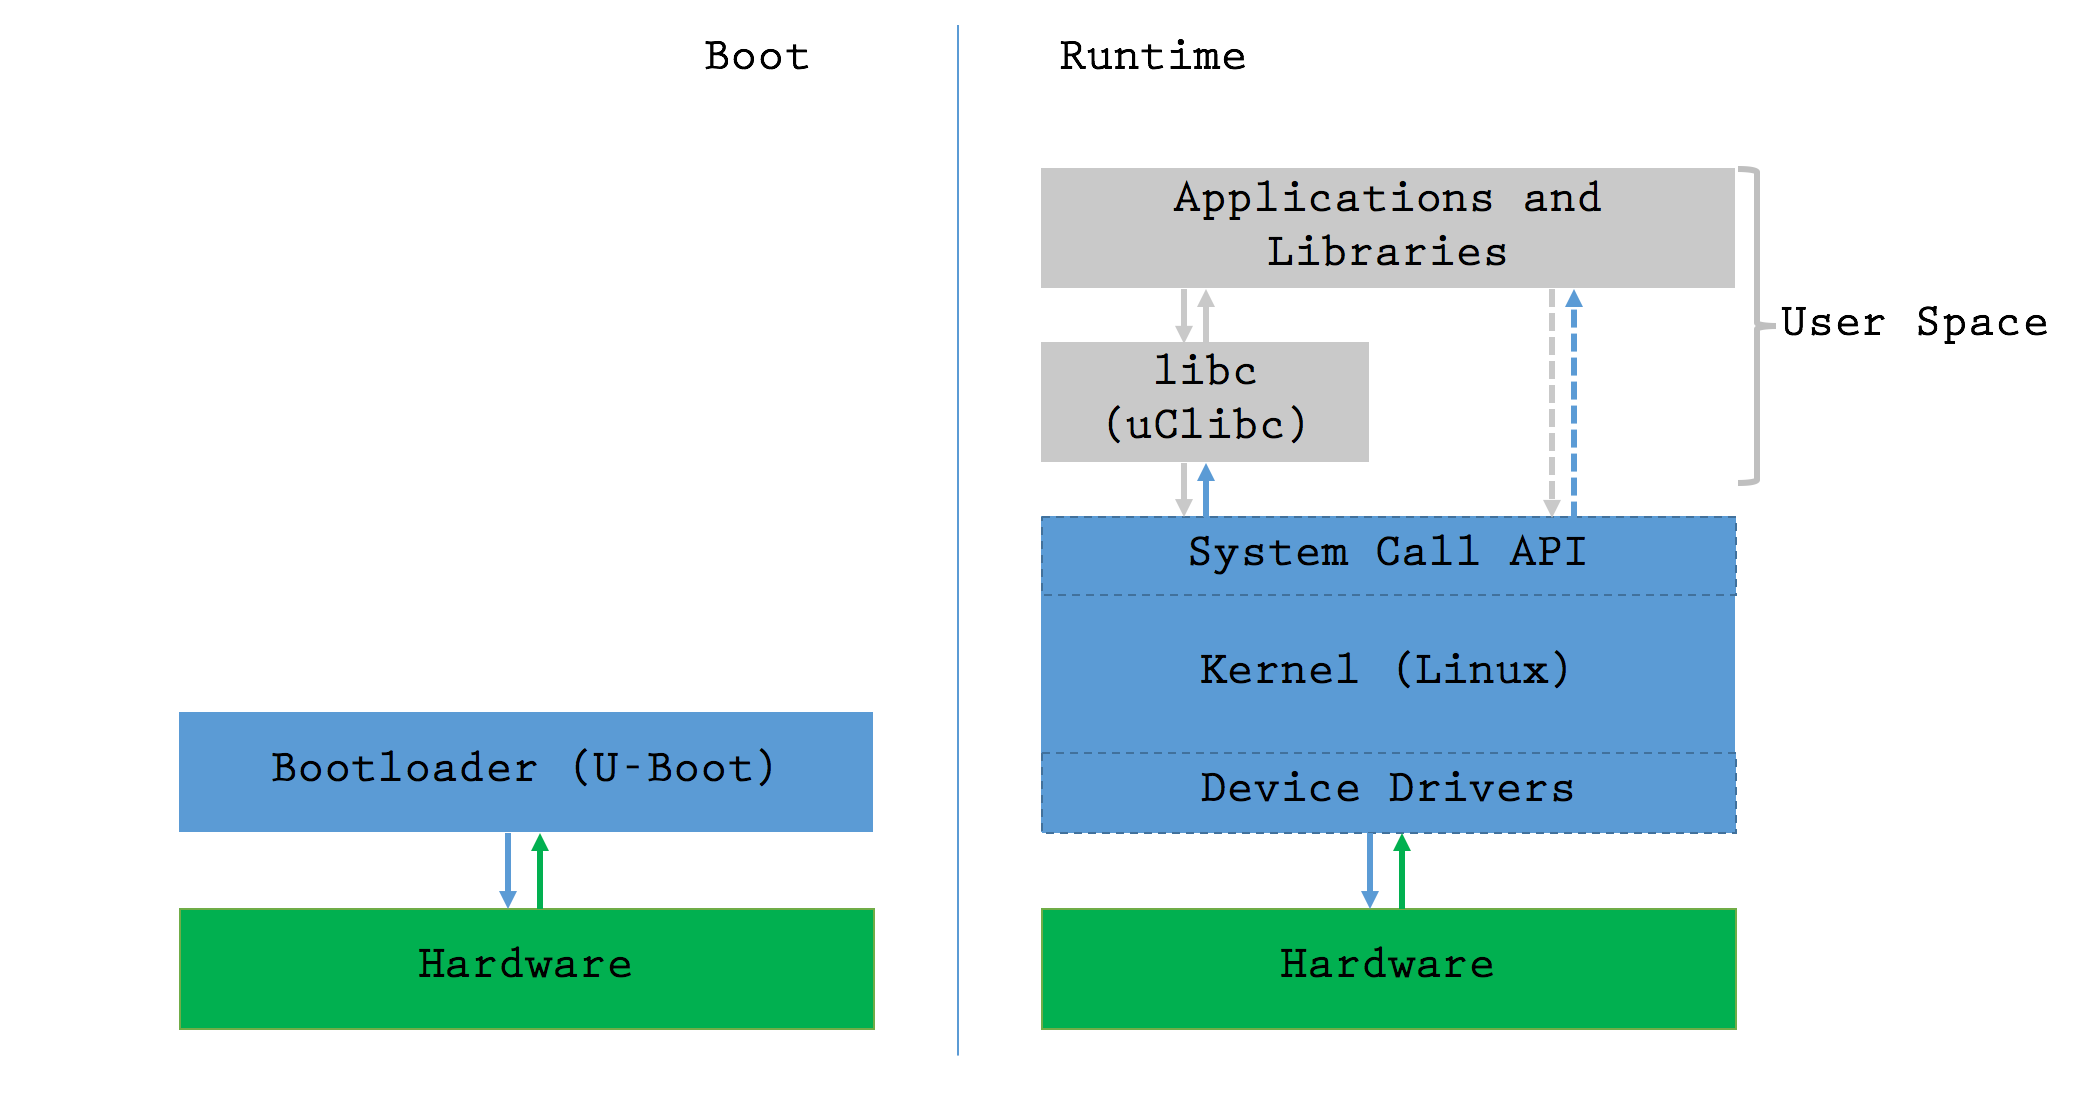
The bootloader is the first piece of code to be executed on boot. Its job is to prepare the kernel for execution, jump into it and stop running. From that point on, the kernel controls the hardware and uses it to run user space logic. A few more details on each of the components:
- Hardware: The CPU, Flash, RAM and other components are all physically connected
- Linux Kernel: It knows how to control the hardware. The developers take the Open Source Linux kernel, write drivers for their specific device and compile everything into an executable Kernel. It manages memory, reads and writes hardware registers, etc. In more complex systems, “kernel modules” provide the possibility of keeping device drivers as separate entities in the file system, and dynamically load them when required; most embedded systems don’t need that level of versatility, so developers save precious resources by compiling everything into the kernel
- libc (“The C Library”): It serves as a general purpose wrapper for the
System Call API, including extremely common functions like
printf,mallocorsystem. Developers are free to call the system call API directly, but in most cases, it’s MUCH more convenient to use libc. Instead of the extremely commonglibc(GNU C library) we usually find in more powerful systems, this device uses a version optimised for embedded devices:uClibc. - User Applications: Executable binaries in
/bin/and shared objects in/lib/(libraries that contain functions used by multiple binaries) comprise most of the high-level logic. Shared objects are used to save space by storing commonly used functions in a single location
Bootloader Source Code
As I’ve mentioned multiple times over this series, this router’s bootloader is U-Boot. U-Boot is GPL licensed, but Huawei failed to include the source code in their website’s release.
Having the source code for the bootloader can be very useful for some projects, where it can help you figure out how to run a custom firmware on the device or modify something; some bootloaders are much more feature-rich than others. In this case, I’m not interested in anything U-Boot has to offer, so I didn’t bother following up on the source code.
Kernel Source Code
Let’s just check out the source code and look for anything that might help. Remember the factory reset button? The button is part of the hardware layer, which means the GPIO pin that detects the button press must be controlled by the drivers. These are the logs we saw coming out of the UART port in a previous post:
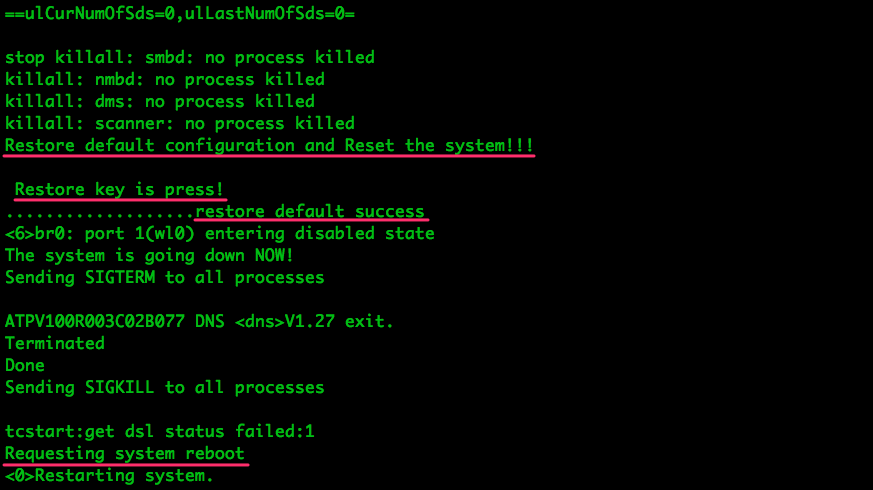
With some simple grep commands we can see how the different components
of the system (kernel, binaries and shared objects) can work together and
produce the serial output we saw:
Having the kernel can help us find poorly implemented security-related algorithms and other weaknesses that are sometimes considered ‘accepted risks’ by manufacturers. Most importantly, we can use the drivers to compile and run our own OS on the device.
User Space Source Code
As we can see in the GPL release, some components of the user space are also
open source, such as busybox and iptables. Given the right (wrong) versions,
public vulnerability databases could be enough to find exploits for any of these.
That being said, if you’re looking for 0-days, backdoors or sensitive data, your best bet is not the open source projects. Device-specific and closed-source code developed by the manufacturer or their contractors has not been so heavily tested, and may very well be riddled with bugs. Most of this code is stored as binaries in the user space; we’ve got the entire filesystem, so we’re good.
Without the source code for user space binaries, we need to find a way to read the machine code inside them. That’s where disassembly comes in.
Binary Disassembly [Theory]
The code inside every executable binary is just a compilation of instructions encoded as Machine Code so they can be processed by the CPU. Our processor’s datasheet will explain the direct equivalence between assembly instructions and their machine code representations. A disassembler has been given that equivalence so it can go through the binary, find data and machine code and translate it into assembly. Assembly is not pretty, but at least it’s human-readable.
Due to the very low-level nature of the kernel, and how heavily it interacts with the hardware, it is incredibly difficult to make any sense of its binary. User space binaries, on the other hand, are abstracted away from the hardware and follow unix standards for calling conventions, binary format, etc. They’re an ideal target for disassembly.
Popular Disassemblers
There are lots of disassemblers for popular architectures like MIPS; some better than others both in terms of functionality and usability. I’d say these 3 are the most popular and powerful disassemblers in the market right now:
- IDA Pro: By far the most popular disassembler/debugger in the market. It is extremely powerful, multi-platform, and there are loads of users, tutorials, plugins, etc. around it. Unfortunately, it’s also VERY expensive; a single person license of the Pro version (required to disassemble MIPS binaries) costs over $1000
- Radare2: Completely Open Source, uses an impressively advanced command line interface, and there’s a great community of hackers around it. On the other hand, the complex command line interface -necessary for the sheer amount of features- makes for a rather steep learning curve
- Binary Ninja: Not open source, but reasonably priced at $100 for a personal license, it’s middle ground between IDA and radare. It’s still a very new tool; it was just released this year, but it’s improving and gaining popularity day by day. It already works very well for some architectures, but unfortunately it’s still missing MIPS support (coming soon) and some other features I needed for these binaries. I look forward to giving it another try when it’s more mature
In order to display the assembly code in a more readable way, all these disasemblers use a “Graph View”. It provides an intuitive way to follow the different possible execution flows in the binary:
Such a clear representation of branches, and their conditionals, loops, etc. is extremely useful. Without it, we’d have to manually jump from one branch to another in the raw assembly code. Not so fun.
If you read the code in that function you can see the disassembler makes a great job displaying references to functions and hardcoded strings. That might be enough to help us find something juicy, but in most cases you’ll need to understand the assembly code to a certain extent.
Gathering Intel on the CPU and Its Assembly Code [Theory]
Let’s take a look at the format of our binaries:
$ file bin/busybox
bin/busybox: ELF 32-bit LSB executable, MIPS, MIPS-II version 1 (SYSV), dynamically linked (uses shared libs), corrupted section header size
Because ELF headers are designed to be platform-agnostic, we can easily find out some info about our binaries. As you can see, we know the architecture (32-bit MIPS), endianness (LSB), and whether it uses shared libraries.
We can verify that information thanks to the Ralink’s
product brief,
which specifies the processor core it uses: MIPS24KEc
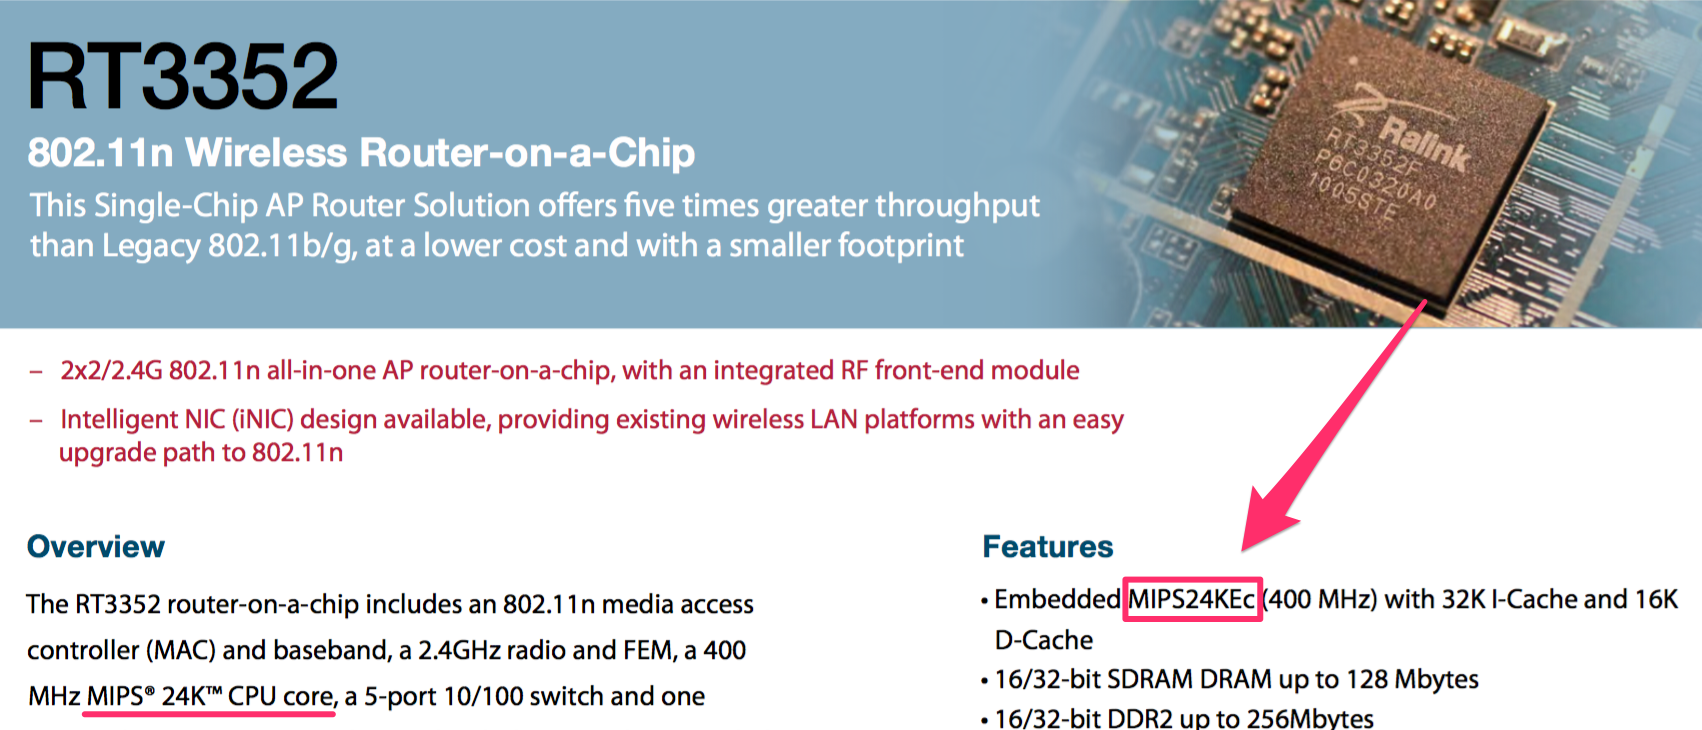
With the exact version of the CPU core, we can easily find its datasheet as released by the company that designed it: Imagination Technologies.
Once we know the basics we can just drop the binary into the disassembler. It will help validate some of our findings, and provide us with the assembly code. In order to understand that code we’re gonna need to know the architecture’s instruction sets and register names:
- MIPS Instruction Set
- MIPS Pseudo-Instructions: Very simple combinations of basic instructions, used for developer/reverser convenience
- MIPS Alternate Register Names:
In MIPS, there’s no real difference between registers; the CPU doesn’t about
what they’re called. Alternate register names exist to make the code more
readable for the developer/reverser:
$a0to$a3for function arguments,$t0to$t9for temporary registers, etc.
Beyond instructions and registers, some architectures may have some quirks. One
example of this would be the presence of
delay slots in MIPS: Instructions
that appear immediately after branch instructions (e.g. beqz, jalr) but are
actually executed before the jump. That sort of non-linearity would be
unthinkable in other architectures.
Some interesting links if you’re trying to learn MIPS: Intro to MIPS Reversing using Radare2, MIPS Assembler and Runtime Simulator, Toolchains to cross-compile for MIPS targets.
Example of User Space Binary Disassembly
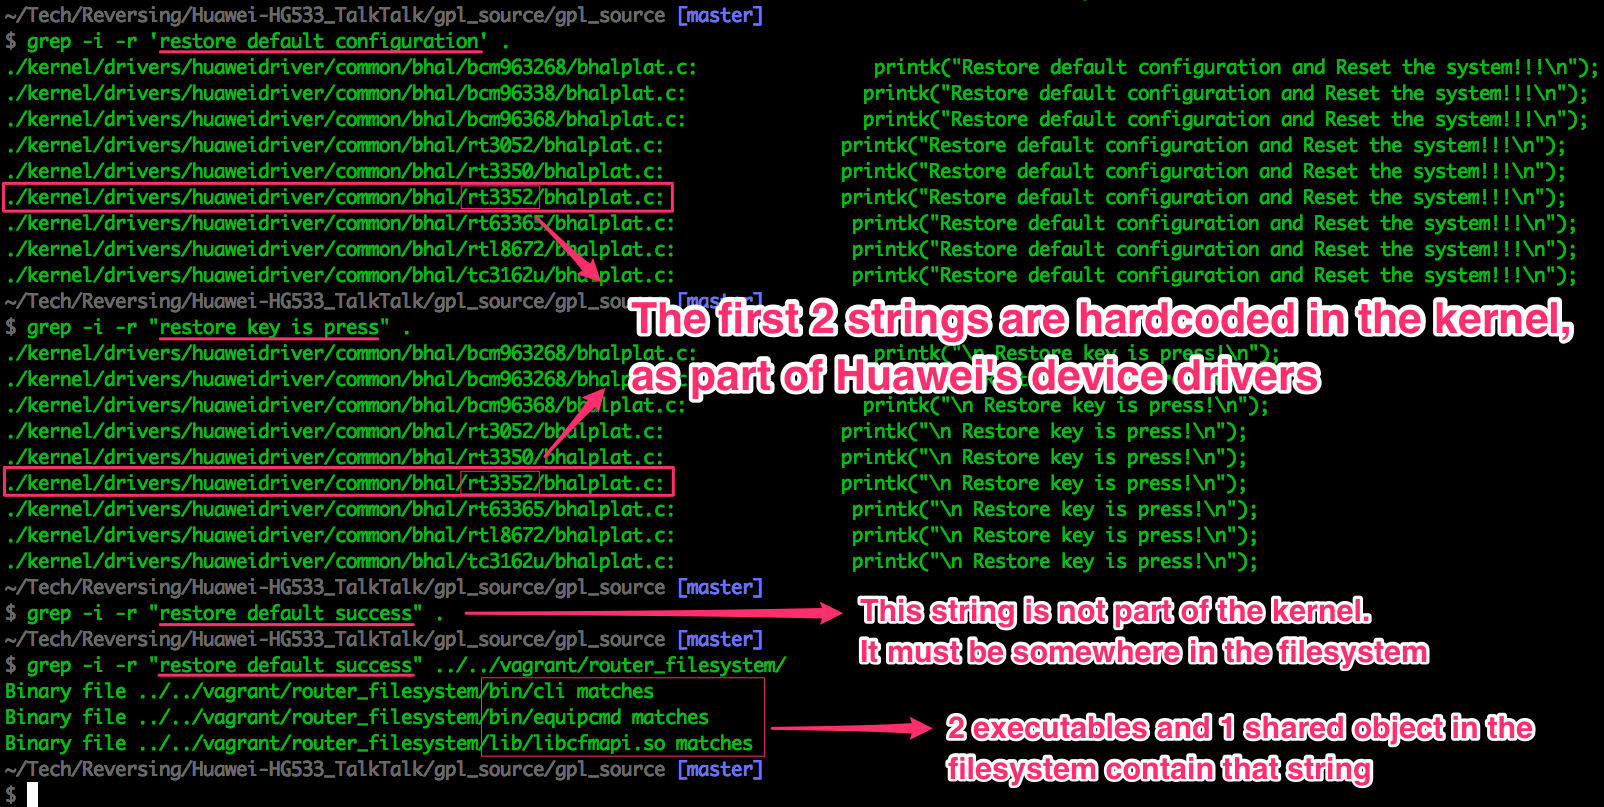
Following up on the reset key example we were using for the Kernel, we’ve got the code that generated some of the UART log messages, but not all of them. Since we couldn’t find the ‘button has been pressed’ string in the kernel’s source code, we can deduce it must have come from user space. Let’s find out which binary printed it:
~/Tech/Reversing/Huawei-HG533_TalkTalk/router_filesystem
$ grep -i -r "restore default success" .
Binary file ./bin/cli matches
Binary file ./bin/equipcmd matches
Binary file ./lib/libcfmapi.so matches
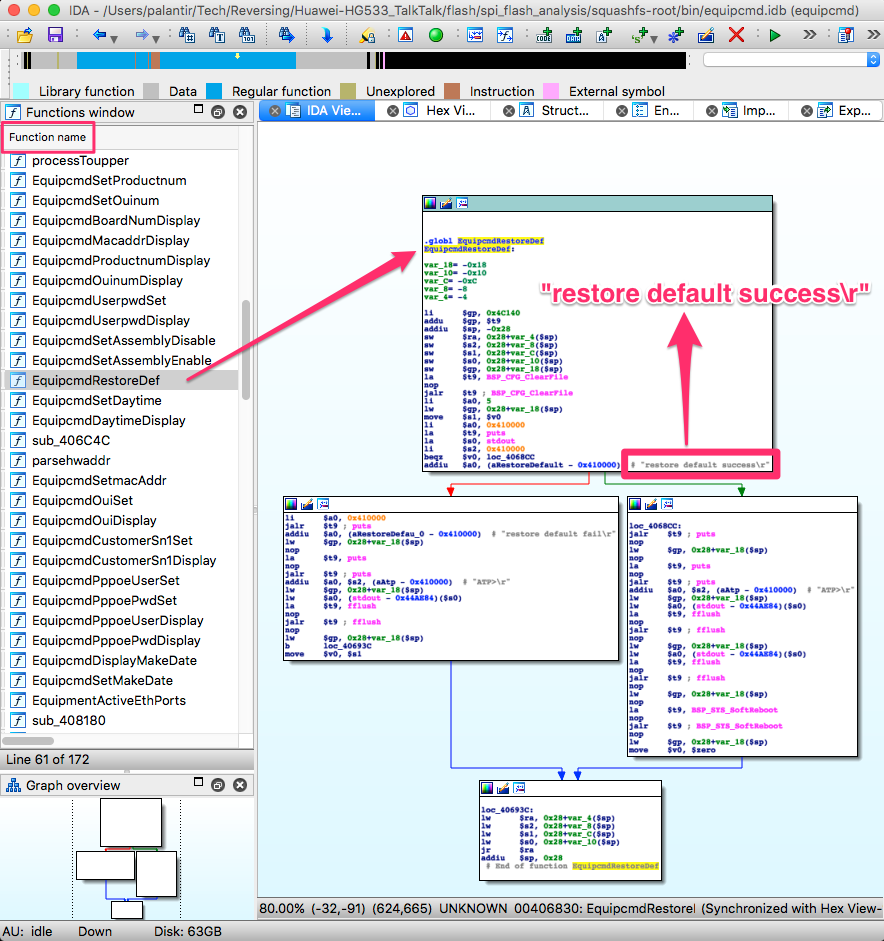
3 files contain the next string found in the logs: 2 executables in /bin/ and
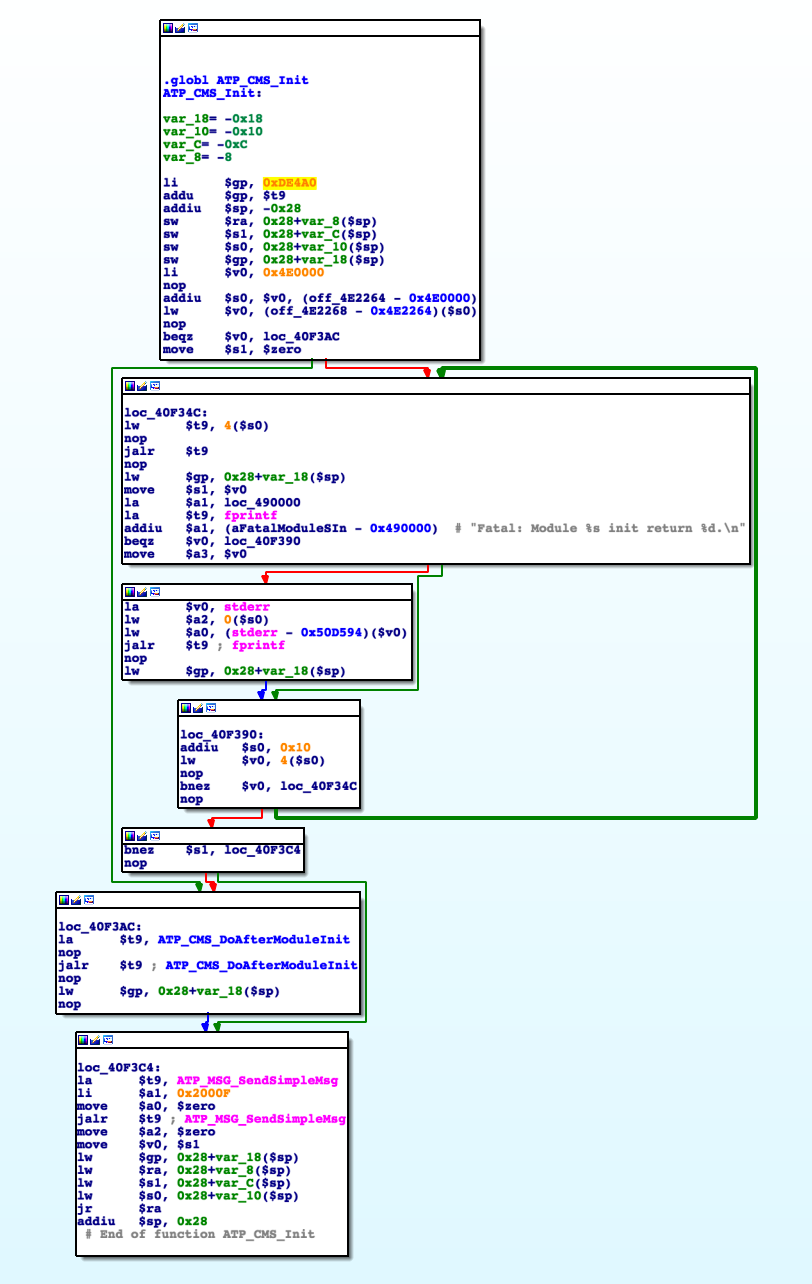
1 shared object in /lib/. Let’s take a look at /bin/equipcmd with IDA:
If we look closely, we can almost read the C code that was compiled into these
instructions. We can see a “clear configuration file”, which would match the
ERASE commands we saw in the SPI traffic capture to the flash IC. Then,
depending on the result, one of two strings is printed: restore default
success or restore default fail . On success, it then
prints something else, flushes some buffers and reboots; this also matches the
behaviour we observed when we pressed the reset button.
That function is a perfect example of delay slots: the addiu instructions
that set both strings as arguments -$a0- for the 2 puts are in the delay
slots of the branch if equals zero and jump and link register instructions.
They will actually be executed before branching/jumping.
As you can see, IDA has the name of all the functions in the binary. That won’t necessarily be the case in other binaries, and now’s a good time to discuss why.
Function Names in a Binary - Intro to Symbol Tables [Theory]
The ELF format specifies the usage of symbol tables: chunks of data inside a binary that provide useful debugging information. Part of that information are human-readable names for every function in the binary. This is extremely convenient for a developer debugging their binary, but in most cases it should be removed before releasing the production binary. The developers were nice enough to leave most of them in there :)
In order to remove them, the developers can use tools like strip, which know what must be kept and what can be spared. These tools serve a double purpose: They save memory by removing data that won’t be necessary at runtime, and they make the reversing process much more complicated for potential attackers. Function names give context to the code we’re looking at, which is massively helpful.
In some cases -mostly when disassembling shared objects- you may see some
function names or none at all. The ones you WILL see are the Dynamic
Symbols in the .dymsym table: We discussed earlier the massive amount of
memory that can be saved by using shared objects to keep the pieces of code you
need to re-use all over the system (e.g. printf()). In order to locate pieces
of data inside the shared object, the caller uses their human-readable name.
That means the names for functions and variables that need to be publicly
accessible must be left in the binary. The rest of them can be removed,
which is why ELF uses 2 symbol tables: .dynsym for publicly accessible
symbols and .symtab for the internal ones.
For more details on symbol tables and other intricacies of the ELF format, check out: The ELF Format - How programs look from the inside, Inside ELF Symbol Tables and the ELF spec (PDF).
Looking for the Default WiFi Password Generation Algorithm
What do We Know?
Remember the wifi password generation algorithm we discussed in part 3? (The Pot of Gold at the End of the Firmware) I explained then why I didn’t expect this router to have one, but let’s take a look anyway.
If you recall, these are the default WiFi credentials in my router:
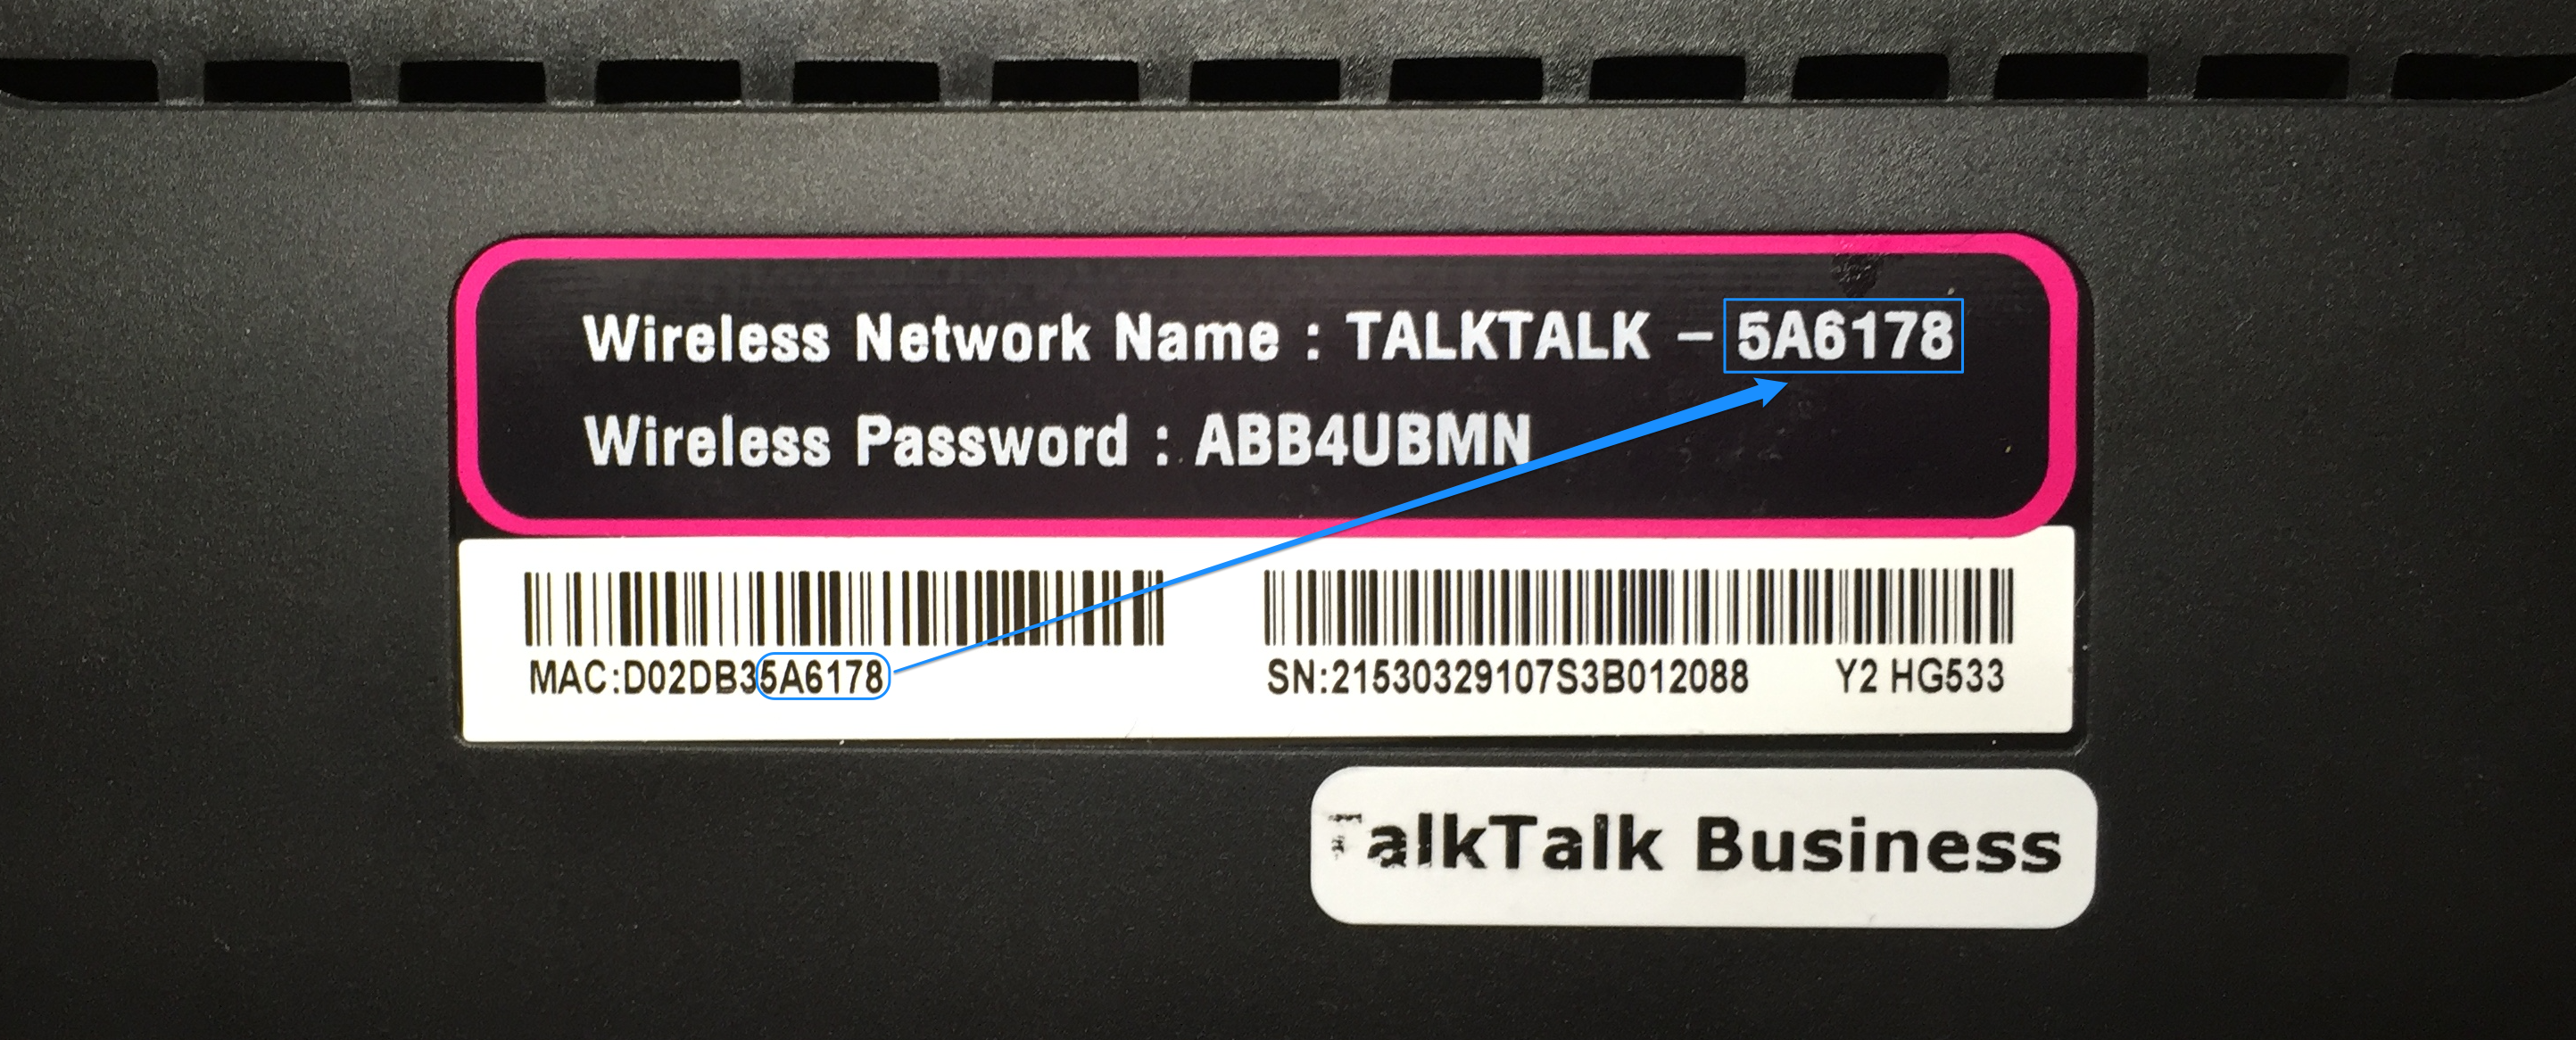
So what do we know?
- Each device is pre-configured with a different set of WiFi credentials
- The credentials could be hardcoded at the factory or generated on the device.
Either way, we know from previous posts that both SSID and password are stored
in the reserved area of Flash memory, and they’re right next to each other
- If they were hardcoded at the factory, the router only needs to read them from a known memory location
- If they are generated in the device and then stored to flash, there must be an algorithm in the router that -given the same inputs- always generates the same outputs. If the inputs are public (e.g. the MAC address) and we can find, reverse and replicate the algorithm, we could calculate default WiFi passwords for any other router that uses the same algorithm
Let’s see what we can do with that…
Finding Hardcoded Strings
Let’s assume there IS such algorithm in the router. Between username and
password, there’s only one string that remains constant across devices:
TALKTALK-. This string is prepended to the last 6 characters of the MAC
address. If the generation algorithm is in the router, surely this string must
be hardcoded in there. Let’s look it up:
$ grep -r 'TALKTALK-' .
Binary file ./bin/cms matches
Binary file ./bin/nmbd matches
Binary file ./bin/smbd matches
2 of those 3 binaries (nmbd and smbd) are part of
samba, the
program used to use the USB flash drive as a network storage device.
They’re probably used to identify the router over the network. Let’s take a
look at the other one: /bin/cms.
Reversing the Functions that Uses Them
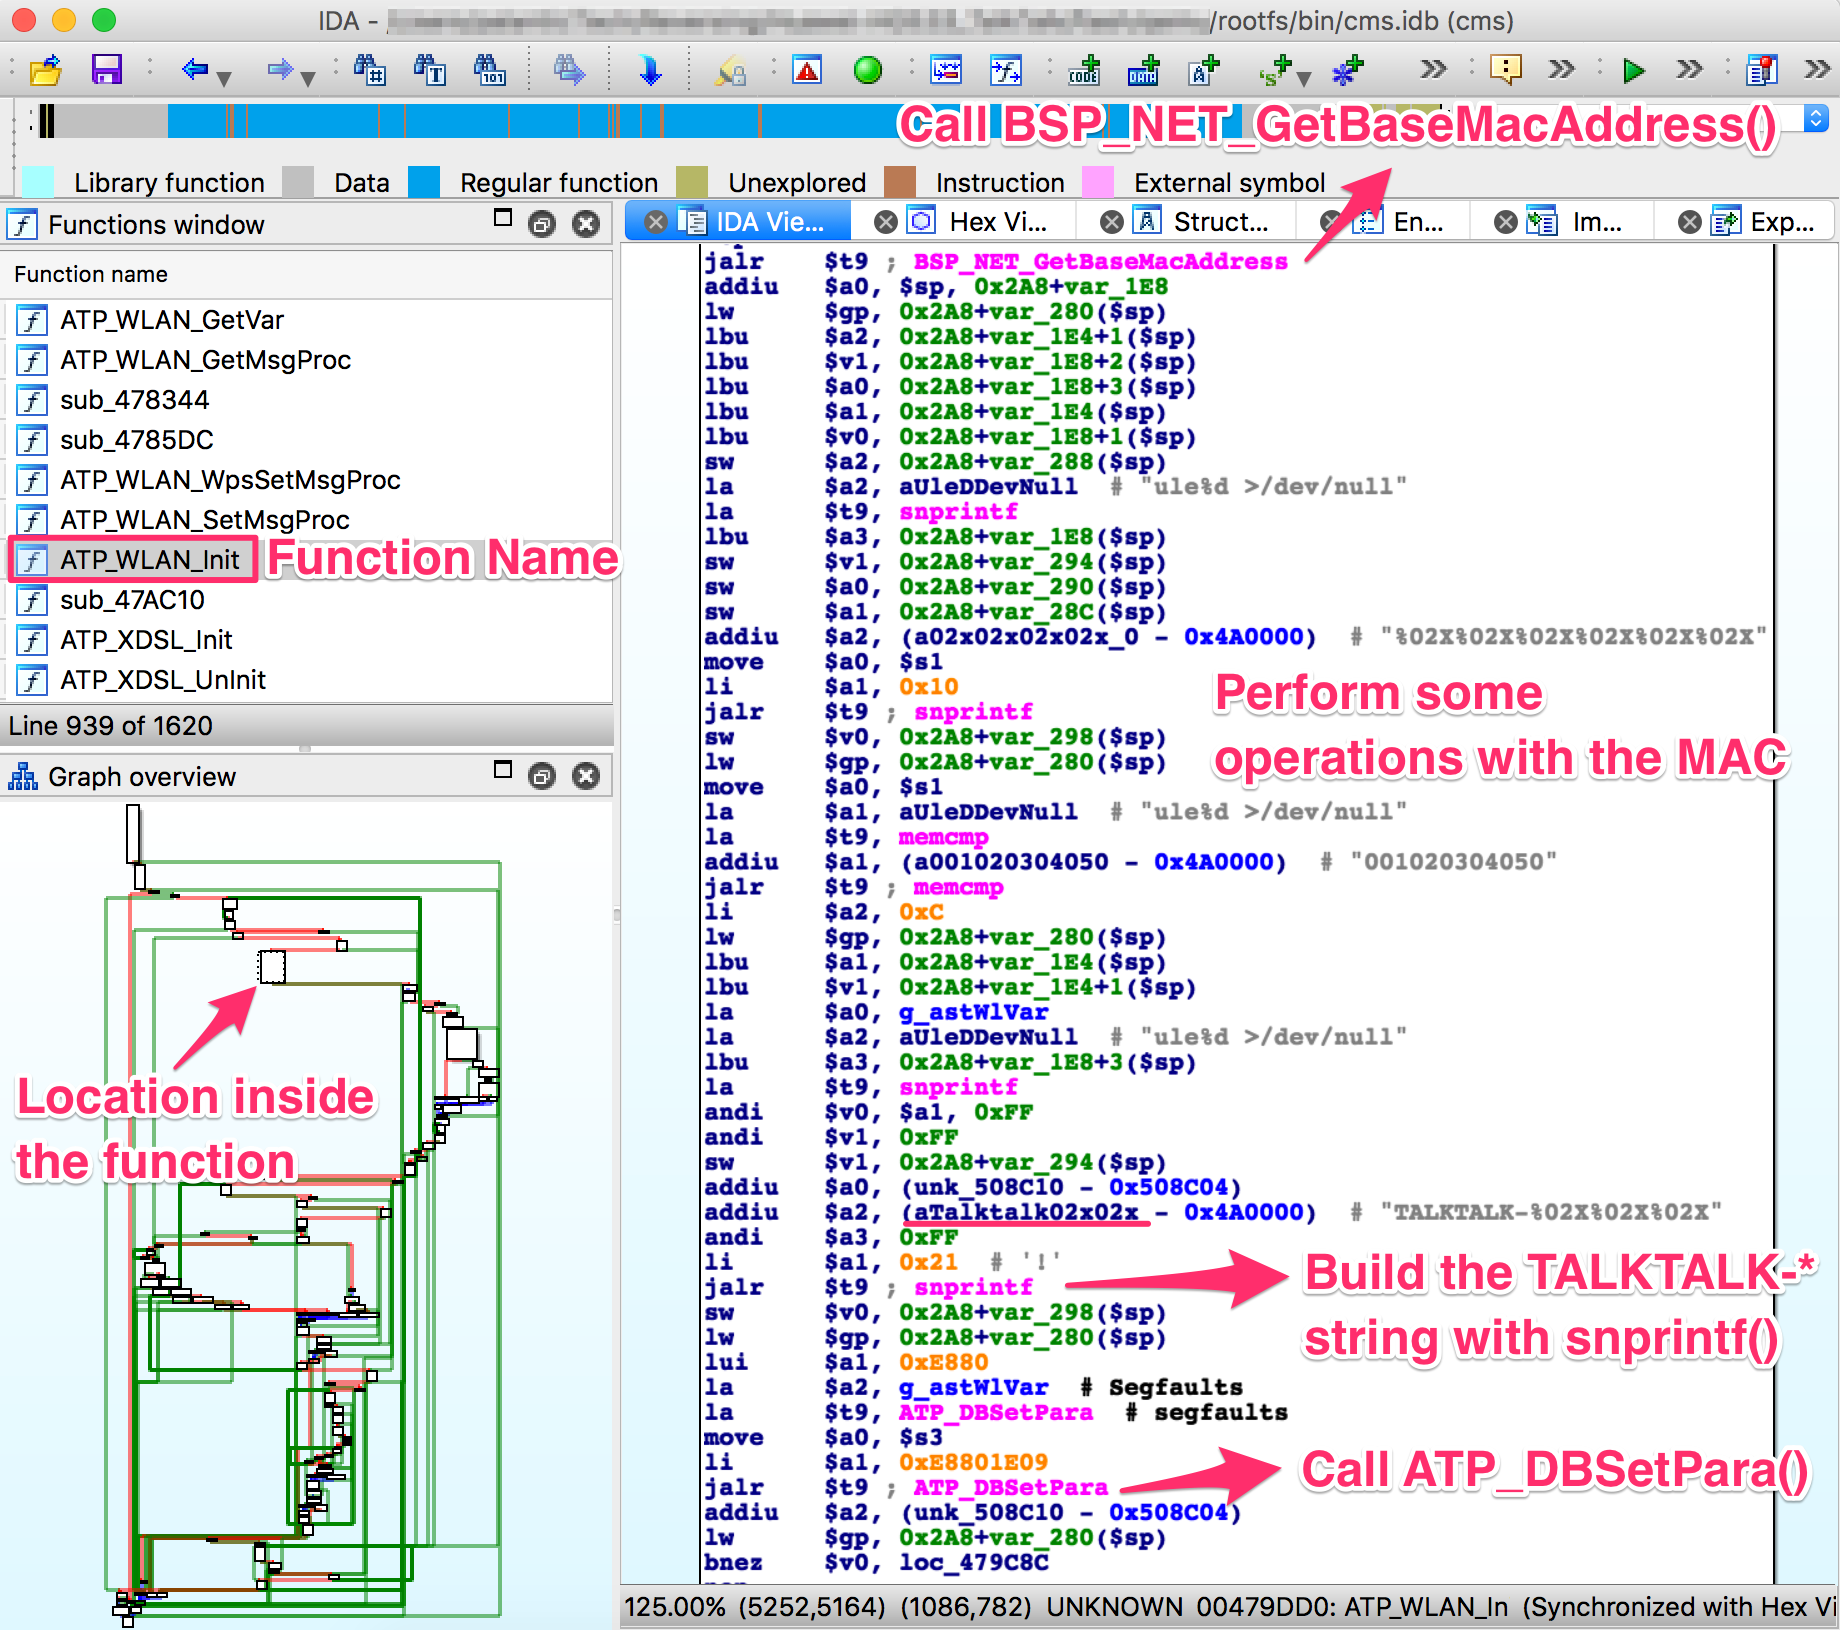
That looks exactly the way we’d expect the SSID generation algorithm to look.
The code is located inside a rather large function called ATP_WLAN_Init, and
somewhere in there it performs the following actions:
- Find out the MAC address of the device we’re running on:
mac = BSP_NET_GetBaseMacAddress()
- Create the SSID string:
snprintf(SSID, "TALKTALK-%02x%02x%02x", mac[3], mac[4], mac[5])
- Save the string somewhere:
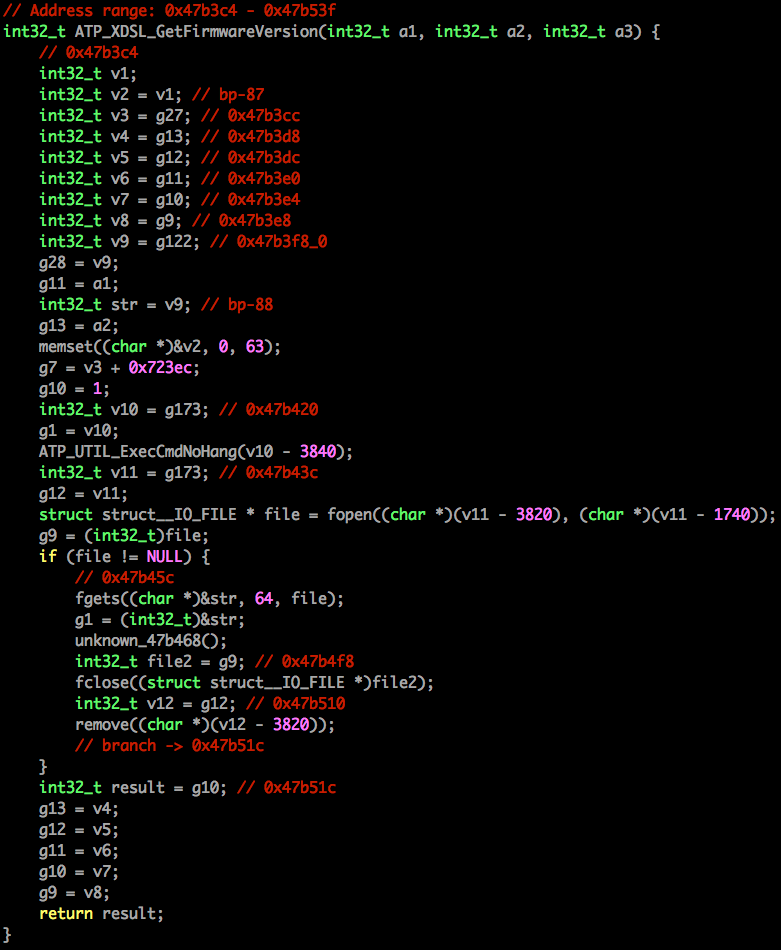
ATP_DBSetPara(SavedRegister3, 0xE8801E09, SSID)
Unfortunately, right after this branch the function simply does an
ATP_DBSave and moves on to start running commands and whatnot. e.g.:
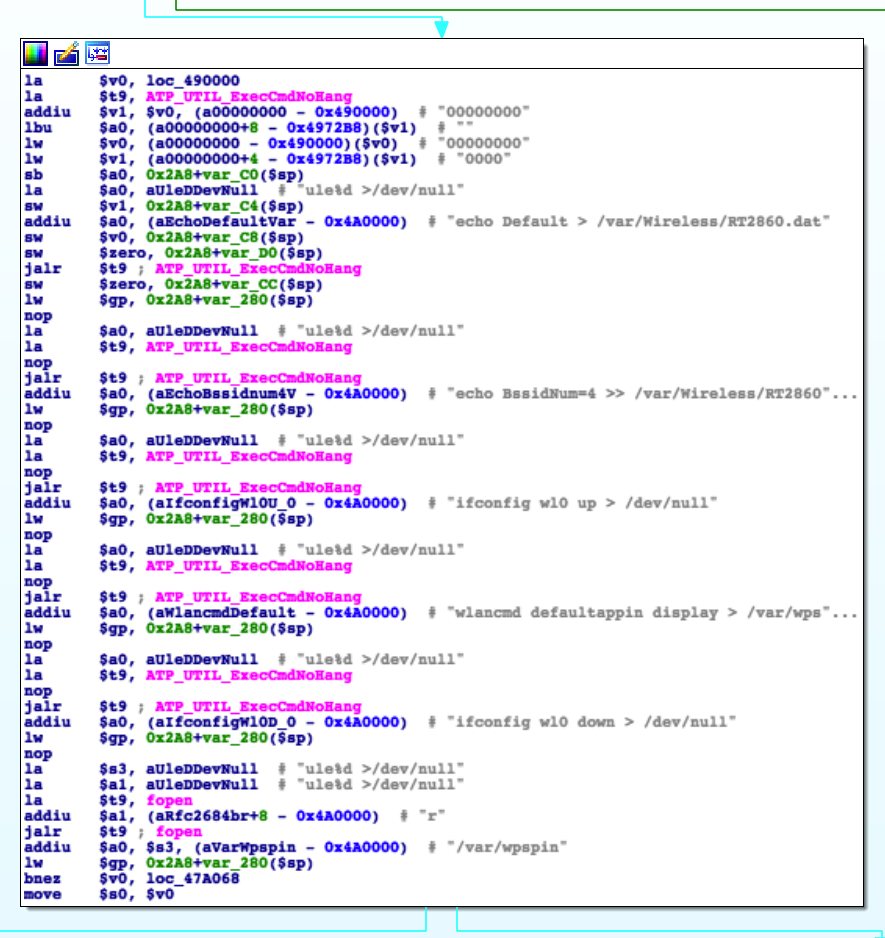
Further inspection of this function and other references to ATP_DBSave did
not reveal anything interesting.
Giving Up
After some time using this process to find potentially relevant pieces of code,
reverse them, and analyse them, I didn’t find anything that looked like the
password generation algorithm. That would confirm the suspicions I’ve had since
we found the default credentials in the protected flash area: The manufacturer
used proper security techniques and flashed the credentials at the factory,
which is why there is no algorithm. Since the designers manufacture their own
hardware, the decision makes perfect sense for this device. They can do
whatever they want with their manufacturing lines, so they decided to do it
right.
I might take another look at it in the future, or try to find it in some other router (I’d like to document the process of reversing it), but you should know this method DOES work for a lot of products. There’s a long history of freely available default WiFi password generators.
Since we already know how to find relevant code in the filesystem binaries, let’s see what else we can do with that knowledge.
Looking for Command Injection Vulnerabilities
One of the most common, easy to find and dangerous vulnerabilities is command injection. The idea is simple; we find an input string that is gonna be used as an argument for a shell command. We try to append our own commands and get them to execute, bypassing any filters that the developers may have implemented. In embedded devices, such vulnerabilities often result in full root control of the device.
These vulnerabilities are particularly common in embedded devices due to their
memory constraints. Say you’re developing the web interface used by the users
to configure the device; you want to add the possibility to ping a
user-defined server from the router, because it’s very valuable information to
debug network problems. You need to give the user the option to define the ping
target, and you need to serve them the results:
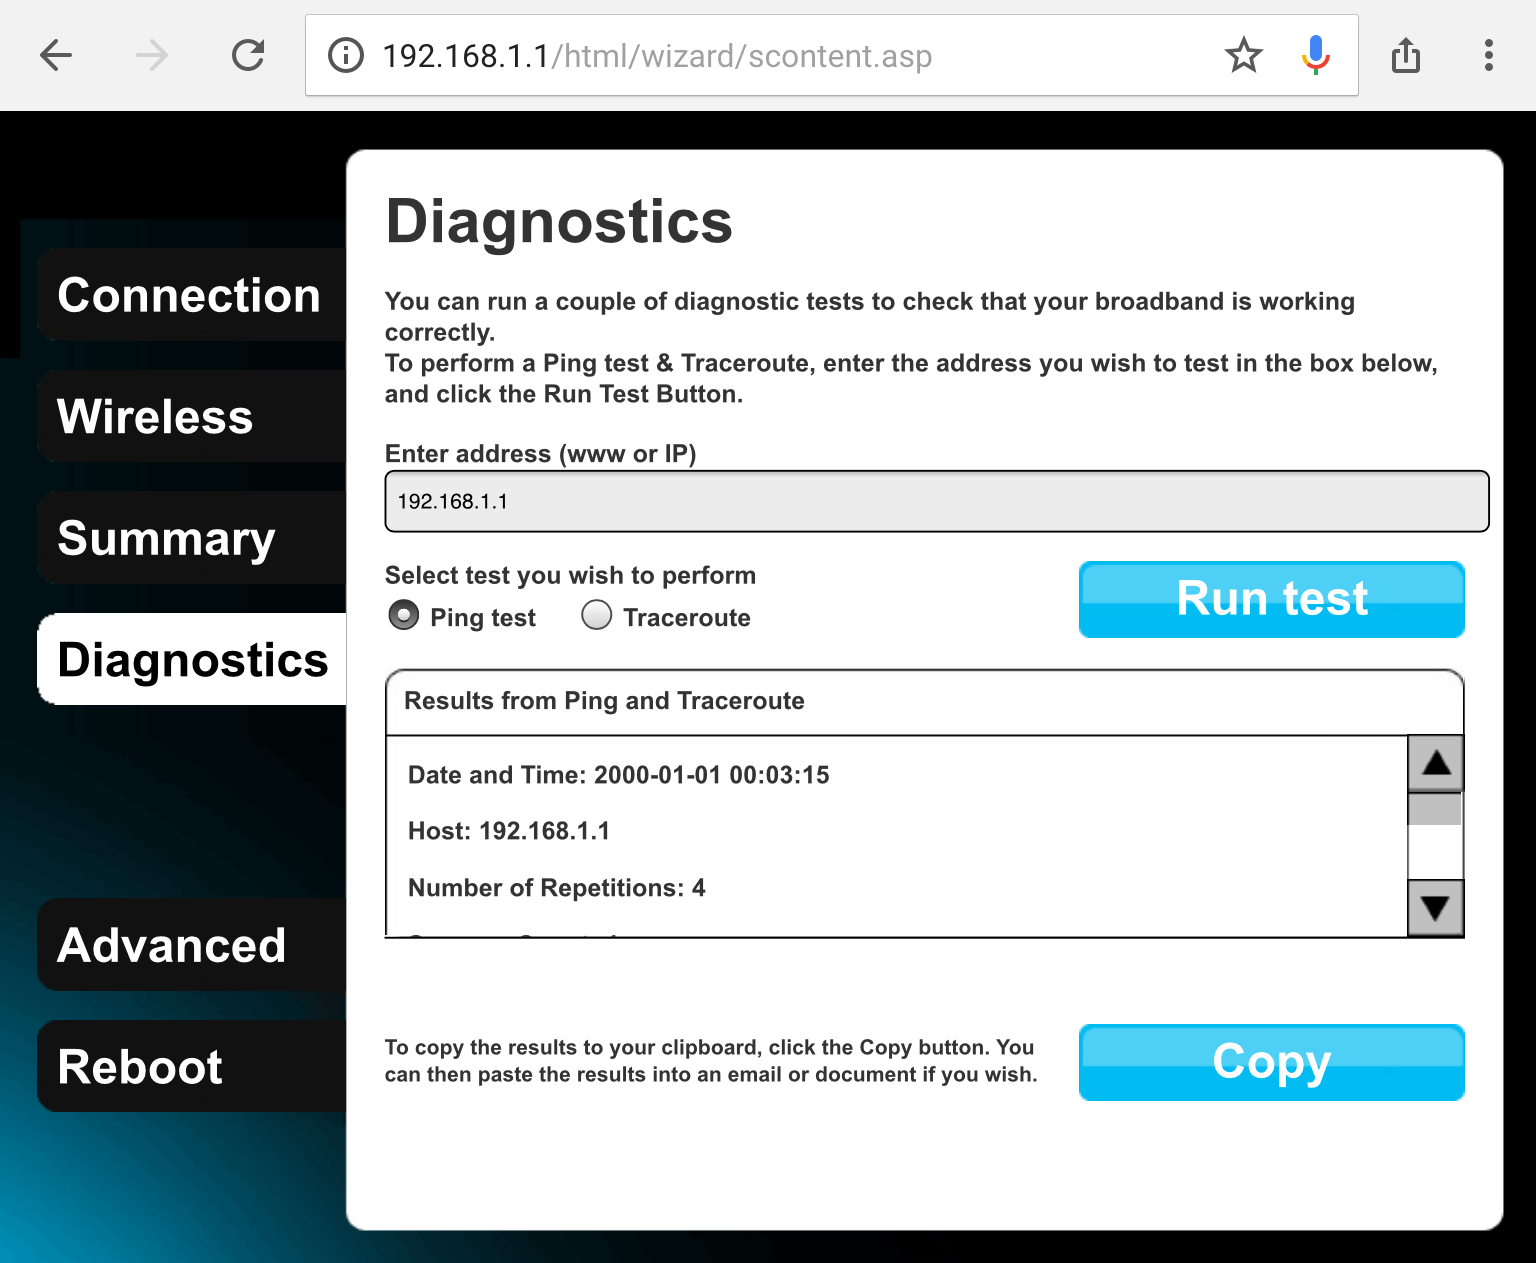
Once you receive the data of which server to target, you have two options: You
find a library with the ICMP protocol implemented and call it directly from the
web backend, or you could use a single, standard function call and use the
router’s already existing ping shell command. The later is easier to
implement, saves memory, etc. and it’s the obvious choice. Taking user input
(target server address) and using it as part of a shell command is where the
danger comes in. Let’s see how this router’s web application, /bin/web,
handles it:
A call to libc’s system()
(not to be confused with a
system call/syscall)
is the easiest way to execute a shell command from an application. Sometimes
developers wrap system() in custom functions in order to systematically filter
all inputs, but there’s always something the wrapper can’t do or some developer
who doesn’t get the memo.
Looking for references to system in a binary is an excellent way to find
vectors for command injections. Just investigate the ones that look like may
be using unfiltered user input. These are all the references to system() in
the /bin/web binary:
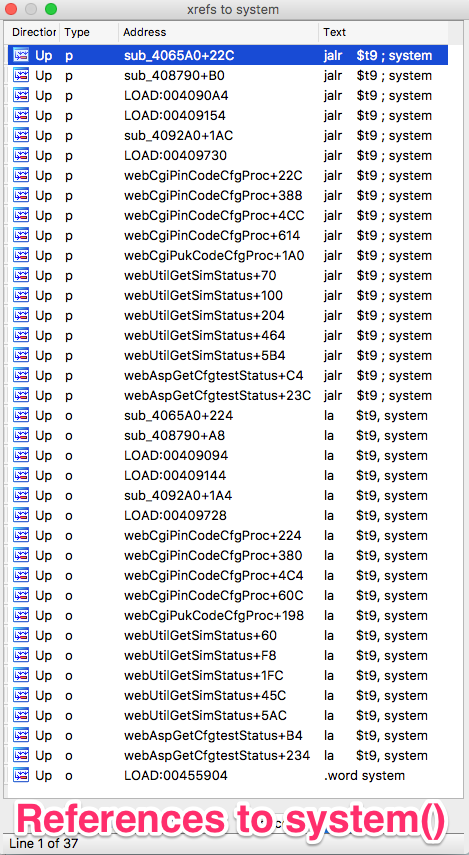
Even the names of the functions can give you clues on whether or not a reference
to system() will receive user input. We can also see some references to
PIN and PUK codes, SIMs, etc. Seems like this application is also used in some
mobile product…
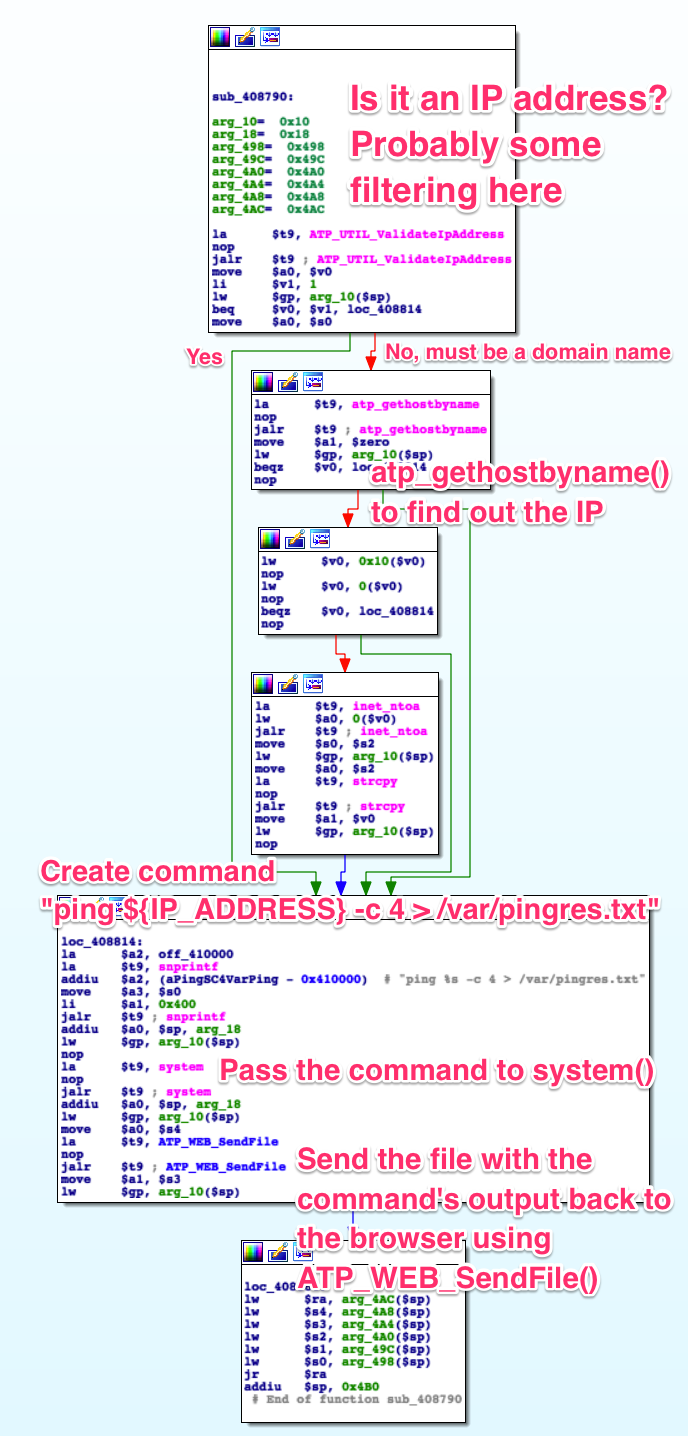
I spent some time trying to find ways around the filtering provided by
atp_gethostbyname (anything that isn’t a domain name causes an error), but I
couldn’t find anything in this field or any others. Further analysis may prove
me wrong. The idea would be to inject something to the effects of this:
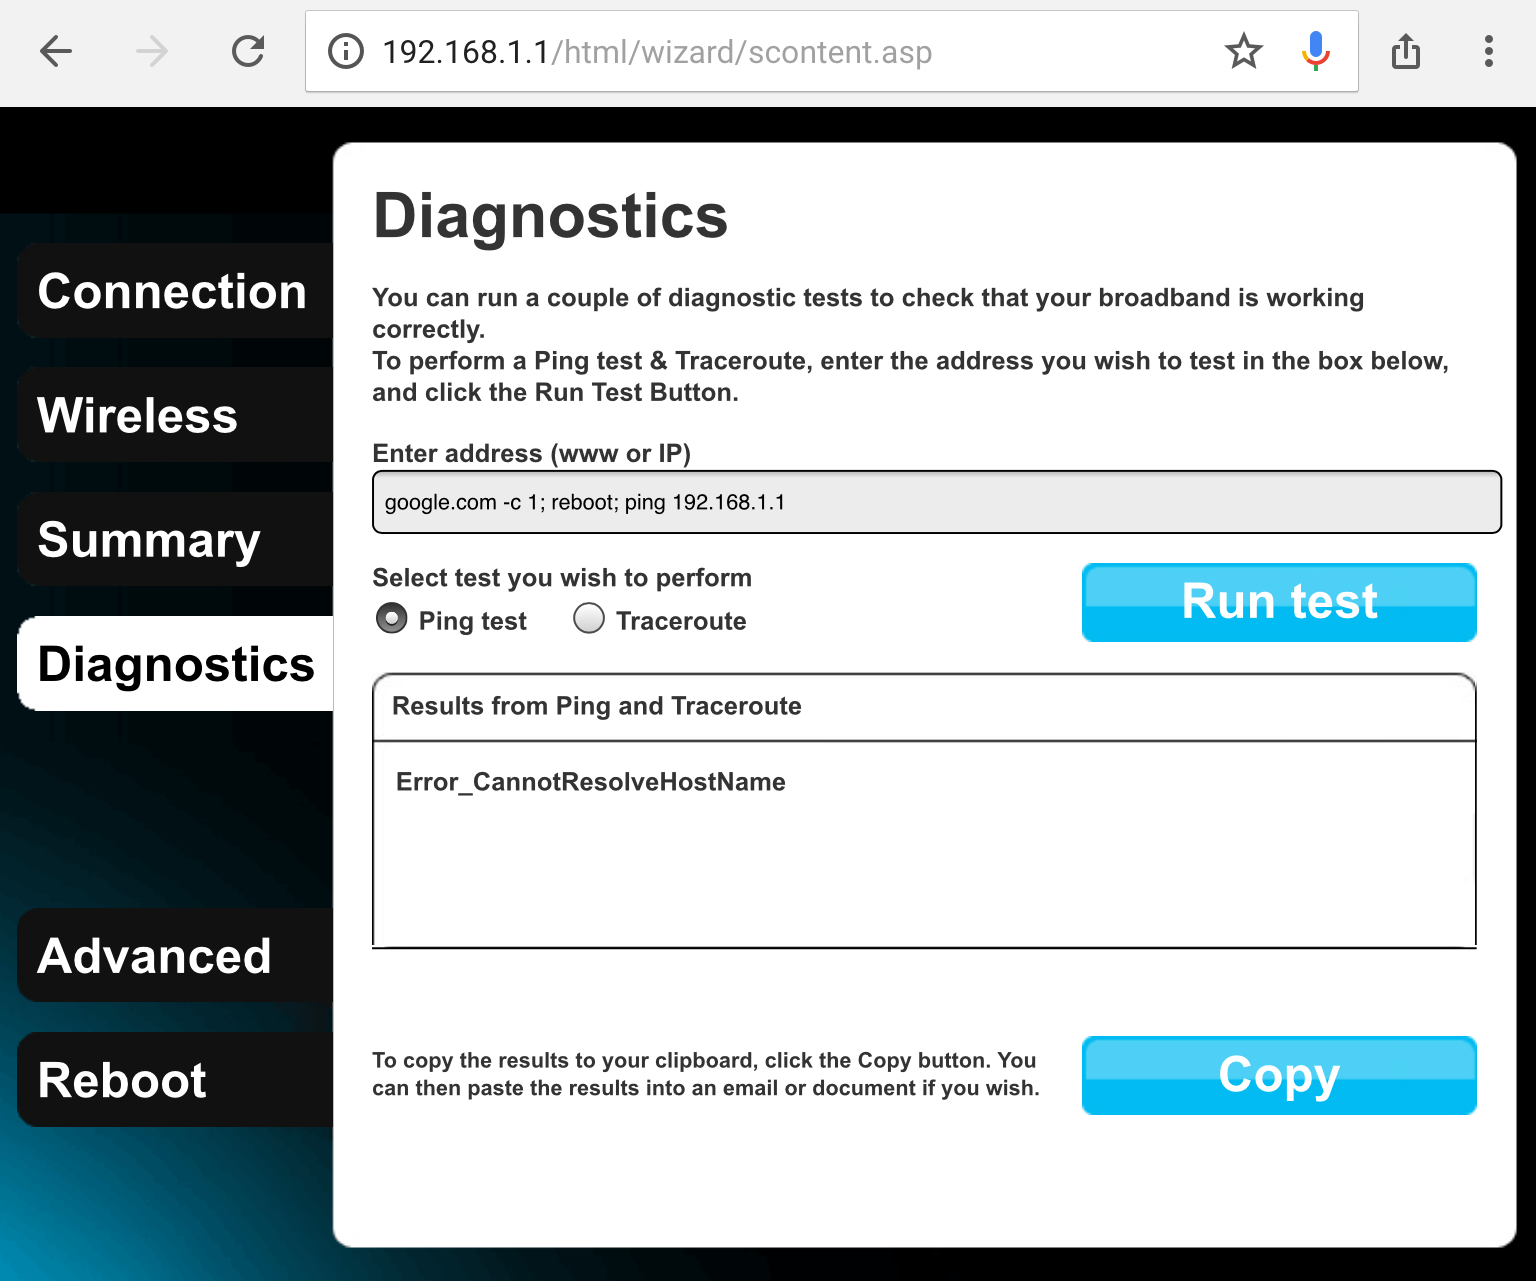
Which would result in this final string being executed as a shell command:
ping google.com -c 1; reboot; ping 192.168.1.1 > /dev/null. If the router
reboots, we found a way in.
As I said, I couldn’t find anything. Ideally we’d like to verify that for all input fields, whether they’re in the web interface or some other network interface. Another example of a network interface potentially vulnerable to remote command injections is the “LAN-Side DSL CPE Configuration” protocol, or TR-064. Even though this protocol was designed to be used over the internal network only, it’s been used to configure routers over the internet in the past. Command injection vulnerabilities in some implementations of this protocol have been used to remotely extract data like WiFi credentials from routers with just a few packets.
This router has a binary conveniently named /bin/tr064; if we take a look,
we find this right in the main() function:
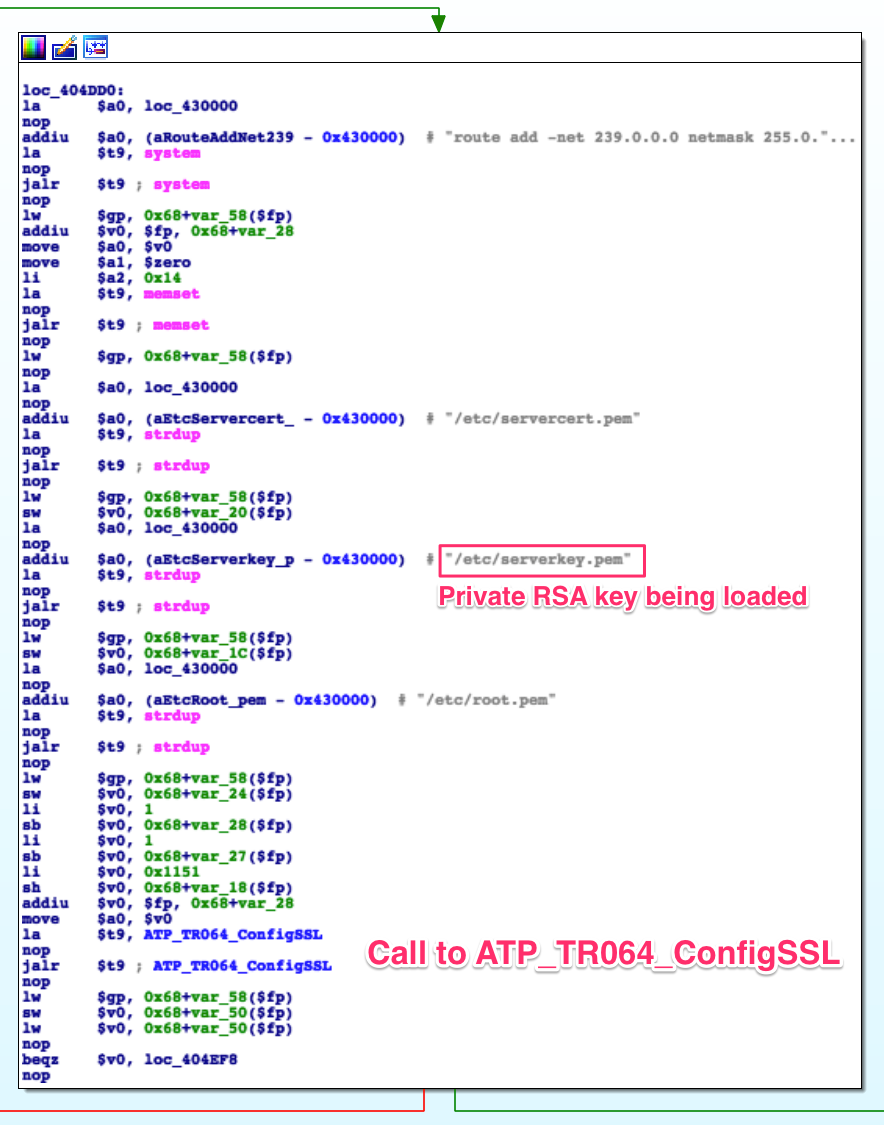
That’s the private RSA key we found in Part 2 being used for SSL authentication. Now we might be able to supplant a router in the system and look for vulnerabilities in their servers, or we might use it to find other attack vectors. Most importantly, it closes the mistery of the private key we found while scouting the firmware.
Looking for More Complex Vulnerabilities [Theory]
Even if we couldn’t find any command injection vulnerabilities, there are always other vectors to gain control of the router. The most common ones are good old buffer overflows. Any input string into the router, whether it is for a shell command or any other purpose, is handled, modified and passed around the code. An error by the developer calculating expected buffer lengths, not validating them, etc. in those string operations can result in an exploitable buffer overflow, which an attacker can use to gain control of the system.
The idea behind a buffer overflow is rather simple: We manage to pass a string into the system that contains executable code. We override some address in the program so the execution flow jumps into the code we just injected. Now we can do anything that binary could do -in embedded systems like this one, where everything runs as root, it means immediate root pwnage.

Developing an exploit for this sort of vulnerability is not as simple as appending commands to find your way around a filter. There are multiple possible scenarios, and different techniques to handle them. Exploits using more involved techniques like ROP can become necessary in some cases. That being said, most household embedded systems nowadays are decades behind personal computers in terms of anti-exploitation techniques. Methods like Address Space Layout Randomization (ASLR), which are designed to make exploit development much more complicated, are usually disabled or not implemented at all.
If you’d like to find a potential vulnerability so you can learn exploit development on your own, you can use the same techniques we’ve been using so far. Find potentially interesting inputs, locate the code that manages them using function names, hardcoded strings, etc. and try to trigger a malfunction sending an unexpected input. If we find an improperly handled string, we might have an exploitable bug.
Once we’ve located the piece of disassembled code we’re going to attack, we’re
mostly interested in string manipulation functions like strcpy, strcat,
sprintf, etc. Their more secure counterparts strncpy, strncat, etc. are
also potentially vulnerable to some techniques, but usually much more
complicated to work with.
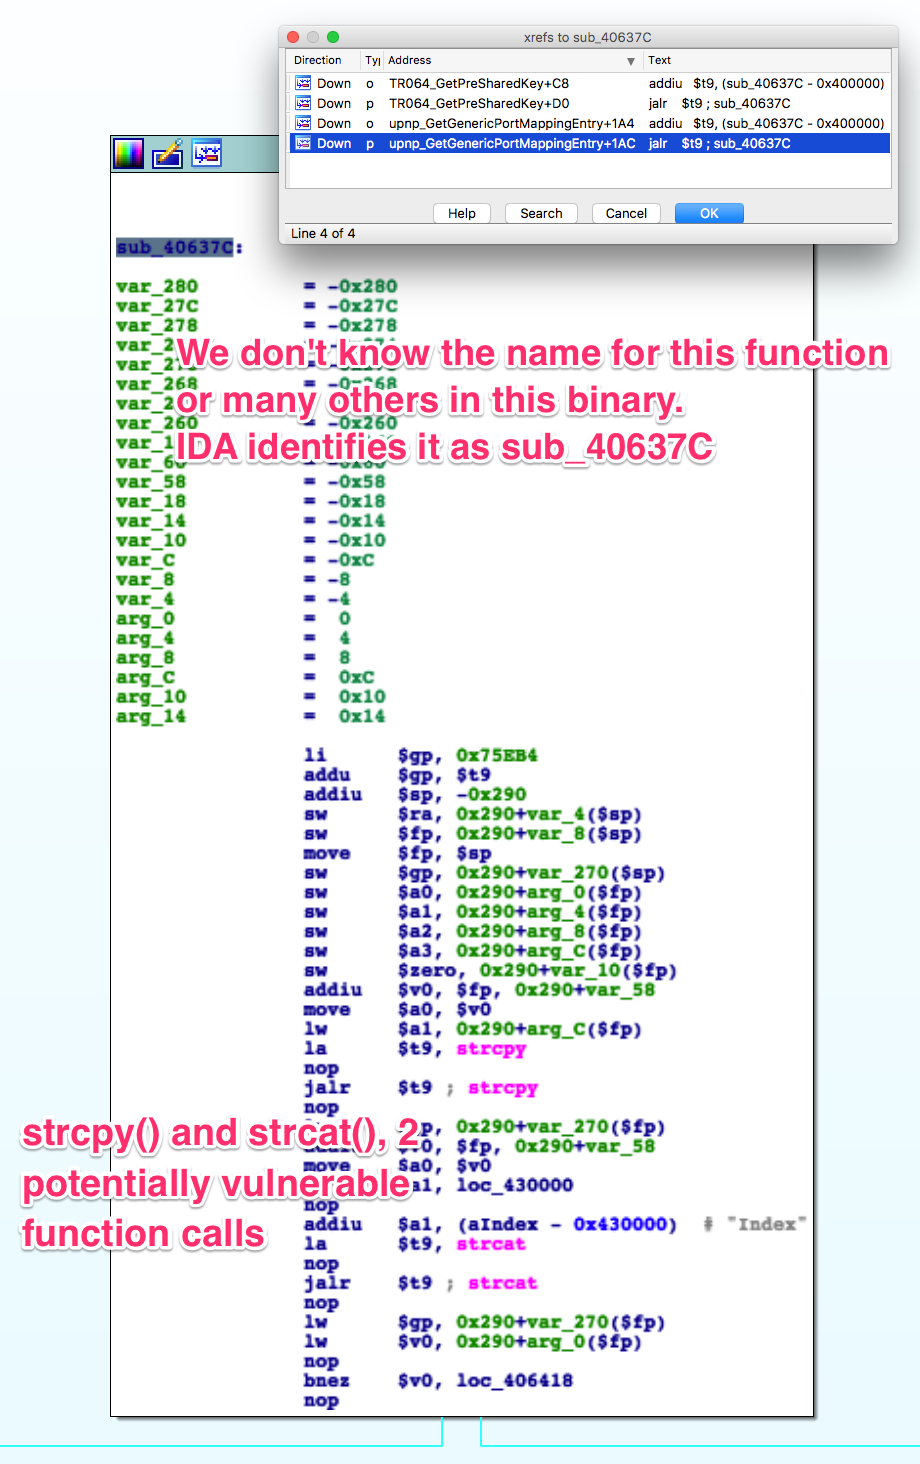
Even though I’m not sure that function -extracted from /bin/tr064- is passed
any user inputs, it’s still a good example of the sort of code you should be
looking for. Once you find potentially insecure string operations that may
handle user input, you need to figure out whether there’s an exploitable bug.
Try to cause a crash by sending unexpectedly long inputs and work from there. Why did it crash? How many characters can I send without causing a crash? Which payload can I fit in there? Where does it land in memory? etc. etc. I may write about this process in more detail at some point, but there’s plenty of literature available online if you’re interested.
Don’t spend all your efforts on the most obvious inputs only -which are also more likely to be properly filtered/handled-; using tools like the burp web proxy (or even the browser itself), we can modify fields like cookies to check for buffer overflows.
Web vulnerabilities like CSRF are also extremely common in embedded devices with web interfaces. Exploiting them to write to files or bypass authentication can lead to absolute control of the router, specially when combined with command injections. An authentication bypass for a router with the web interface available from the Internet could very well expose the network to being remotely man in the middle’d. They’re definitely an important attack vector, even though I’m not gonna go into how to find them.
Decompiling Binaries [Theory]
When you decompile a binary, instead of simply translating Machine Code to Assembly Code, the decompiler uses algorithms to identify functions, loops, branches, etc. and replicate them in a higher level language like C or Python.
That sounds like a brilliant idea for anybody who has been banging their head against some assembly code for a few hours, but an additional layer of abstraction means more potential errors, which can result in massive wastes of time.
In my (admittedly short) personal experience, the output just doesn’t look reliable enough. It might be fine when using expensive decompilers (IDA itself supports a couple of architectures), but I haven’t found one I can trust with MIPS binaries. That being said, if you’d like to give one a try, the RetDec online decompiler supports multiple architectures- including MIPS.
Even as a ‘high level’ language, the code is not exactly pretty to look at.
Next Steps
Whether we want to learn something about an algorithm we’re reversing, to debug an exploit we’re developing or to find any other sort of vulnerability, being able to execute (and, if possible, debug) the binary on an environment we fully control would be a massive advantage. In some/most cases -like this router-, being able to debug on the original hardware is not possible. In the next post, we’ll work on CPU emulation to debug the binaries in our own computers.
Thanks for reading! I’m sorry this post took so long to come out. Between work, hardwear.io and seeing family/friends, this post was written about 1 paragraph at a time from 4 different countries. Things should slow down for a while, so hopefully I’ll be able to publish Part 6 soon. I’ve also got some other reversing projects coming down the pipeline, starting with hacking the Amazon Echo and a router with JTAG. I’ll try to get to those soon, work permitting… Happy Hacking :)
Tips and Tricks
Mistaken xrefs and how to remove them
Sometimes an address is loaded into a register for 16bit/32bit adjustments. The contents of that address have no effect on the rest of the code; it’s just a routinary adjustment. If the address that is assigned to the register happens to be pointing to some valid data, IDA will rename the address in the assembly and display the contents in a comment.
It is up to you to figure out whether an x-ref makes sense or not. If it
doesn’t, select the variable and press o in IDA to ignore the contents and
give you only the address. This makes the code much less confusing.
Setting function prototypes so IDA comments the args around calls for us
Set the cursor on a function and press y. Set the prototype for the function:
e.g. int memcpy(void *restrict dst, const void *restrict src, int n);.
Note:IDA only understands built-in types, so we can’t use types like size_t.
Once again we can use the extern declarations found in the GPL source code.
When available, find the declaration for a specific function, and use the same
types and names for the arguments in IDA.
Taking Advantage of the GPL Source Code
If we wanna figure out what are the 1st and 2nd parameters of a function like
ATP_DBSetPara, we can sometimes rely on the GPL source code. Lots of functions
are not implemented in the kernel or any other open source component, but
they’re still used from one of them. That means we can’t see the code we’re
interested in, but we can see the extern declarations for it. Sometimes the
source will include documentation comments or descriptive variable names; very
useful info that the disassembly doesn’t provide:
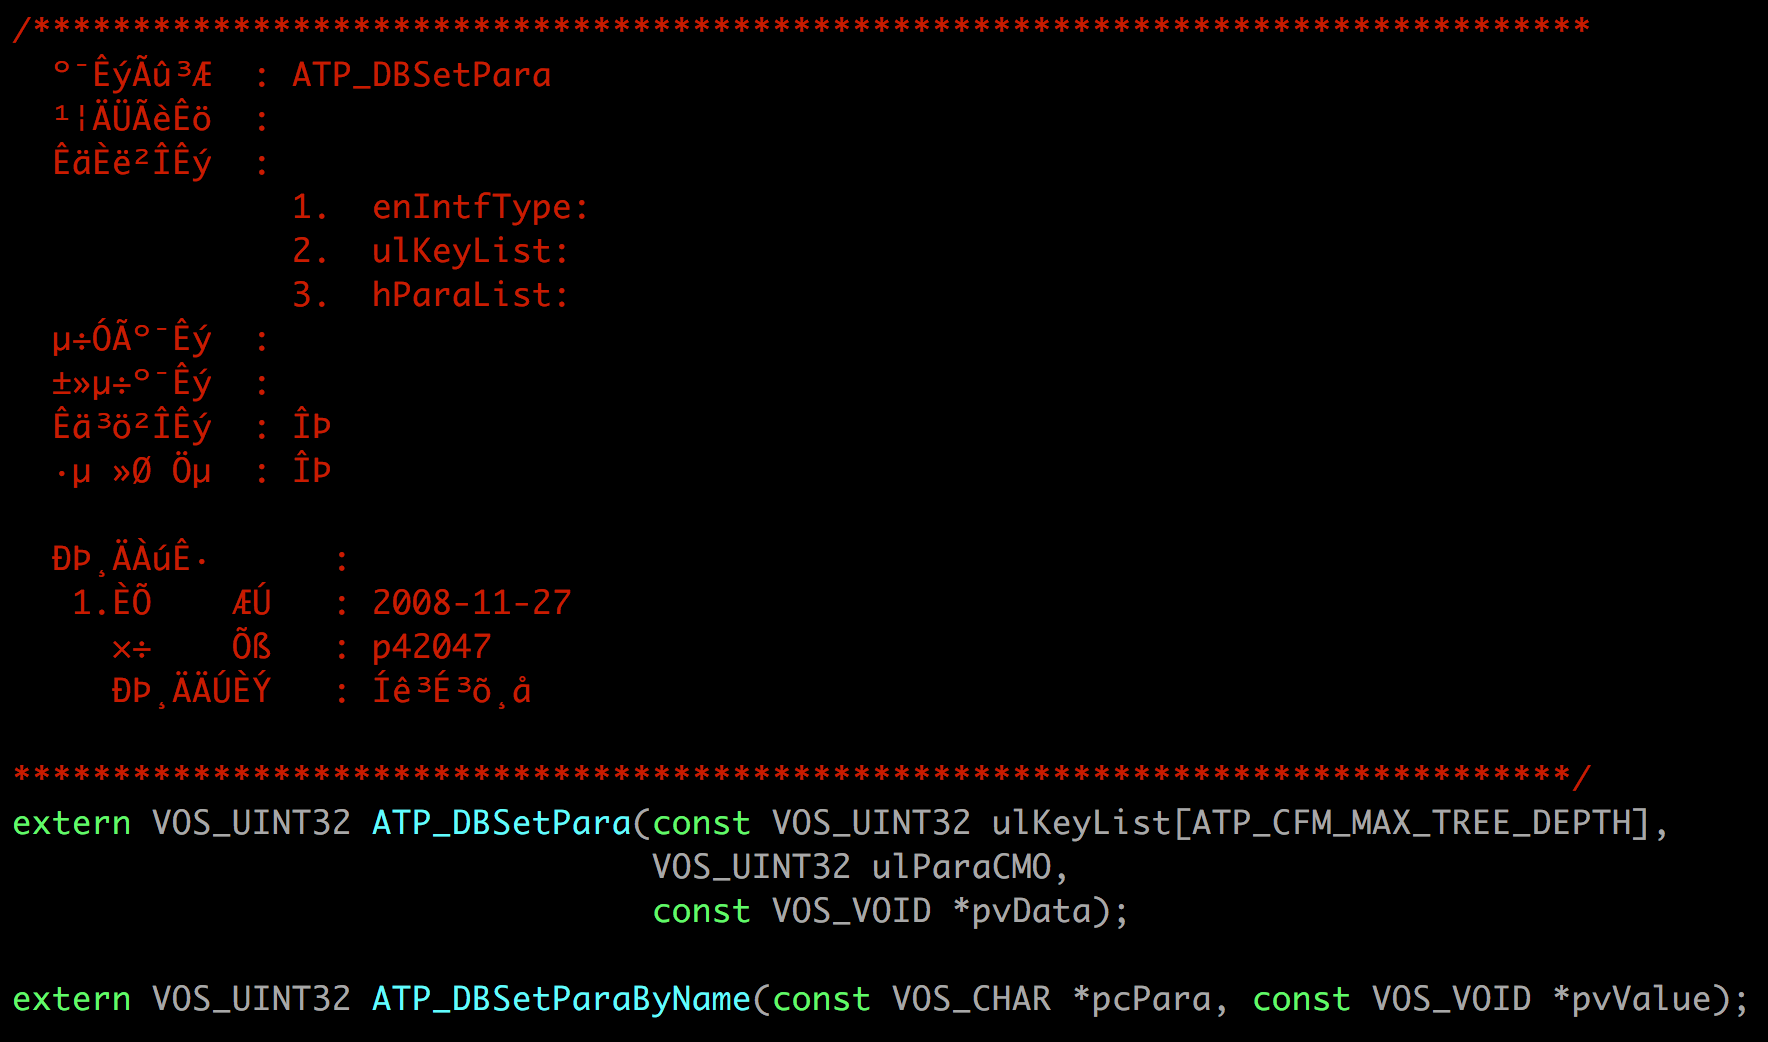
Unfortunately, the function documentation comment is not very useful in this
case -seems like there were encoding issues with the file at some point, and
everything written in Chinese was lost. At least now we know that the first
argument is a list of keys, and the second is something they call ParamCMO.
ParamCMO is a constant in our disassembly, so it’s probably just a
reference to the key we’re trying to set.
Disassembly Methods - Linear Sweep vs Recursive Descent
The structure of a binary can vary greatly depending on compiler, developers, etc. How functions call each other is not always straightforward for a disassembler to figure out. That means you may run into lots of ‘orphaned’ functions, which exist in the binary but do not have a known caller.
Which disassembler you use will dictate whether you see those functions or not,
some of which can be extremely important to us (e.g. the ping function in the
web binary we reversed earlier). This is due to how they scan binaries for
content:
- Linear Sweep: Read the binary one byte at a time, anything that looks like a function is presented to the user. This requires significant logic to keep false positives to a minimum
- Recursive Descent: We know the binary’s entry point. We find all functions
called from
main(), then we find the functions called from those, and keep recursively displaying functions until we’ve got “all” of them. This method is very robust, but any functions not referenced in a standard/direct way will be left out
Make sure your disassembler supports linear sweep if you feel like you’re missing any data. Make sure the code you’re looking at makes sense if you’re using linear sweep.