Integrating Systems Into Your Smart Home Using Arduino Nano Matter
22 Jul 2024After having recently purchased a home, I’ve been working on setting up some level of smart home automation/connectivity.
One of the things in my list was the ability to control my air conditioning remotely using my phone, so I can get it running before I get home, have it turn off when I leave, etc.
But how?
System Overview
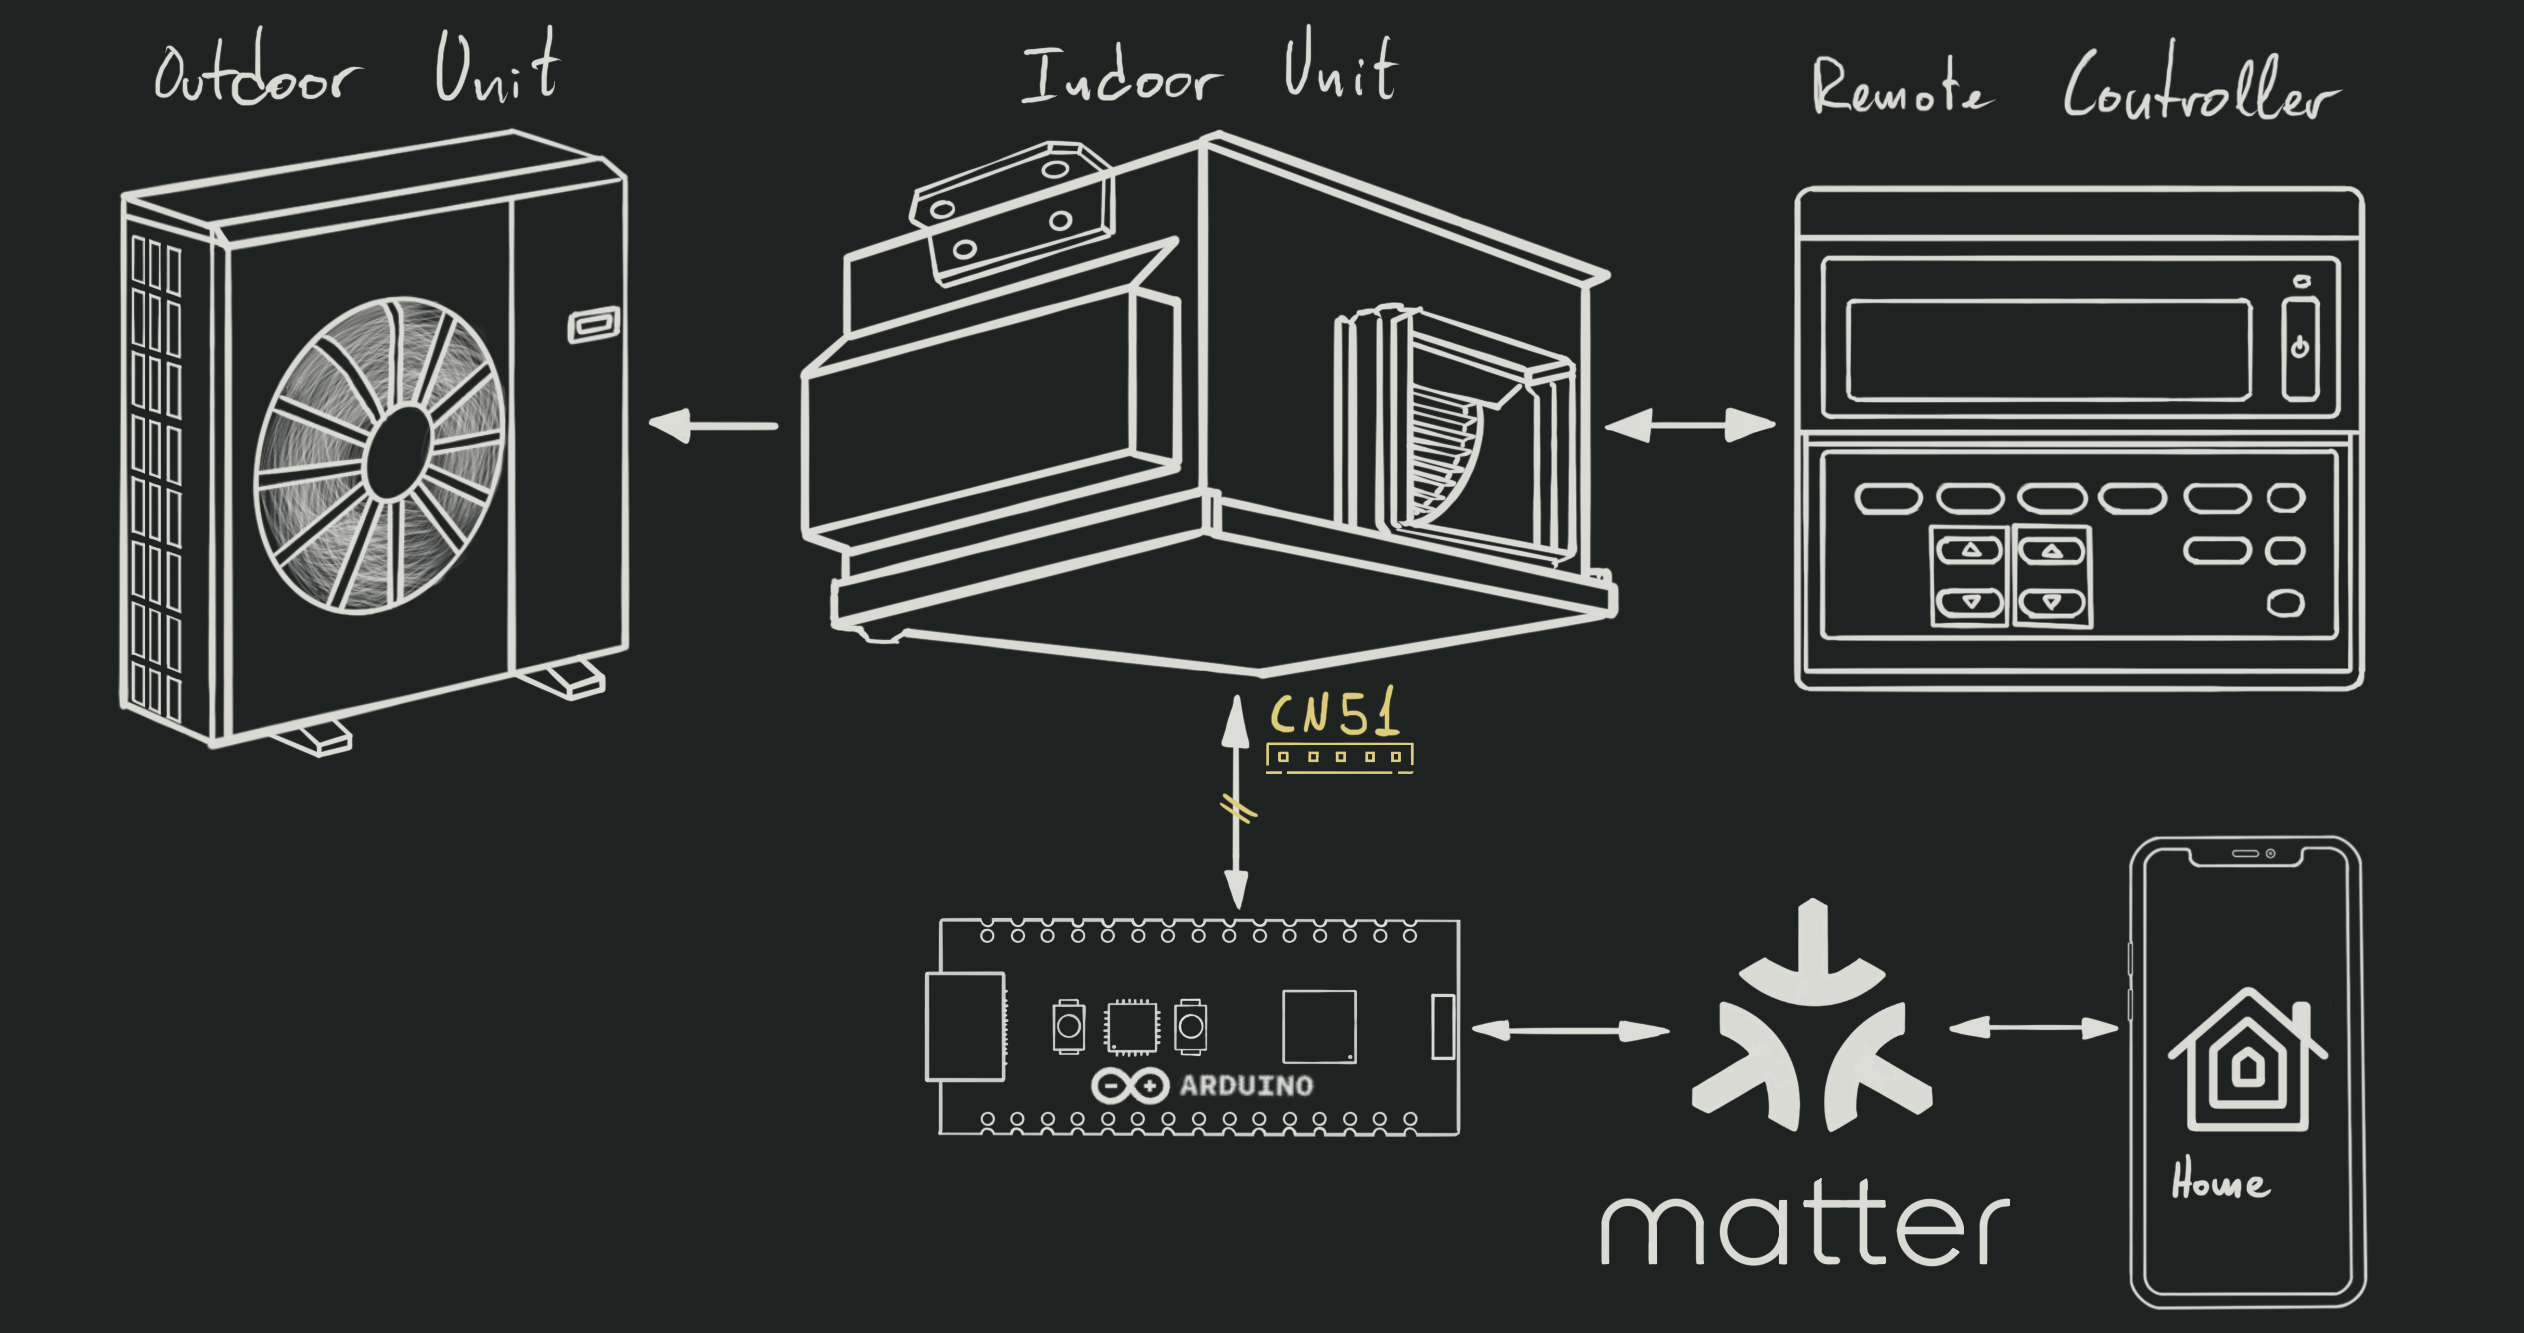
There are 3 components in my very old Mitsubishi Electric HVAC system:
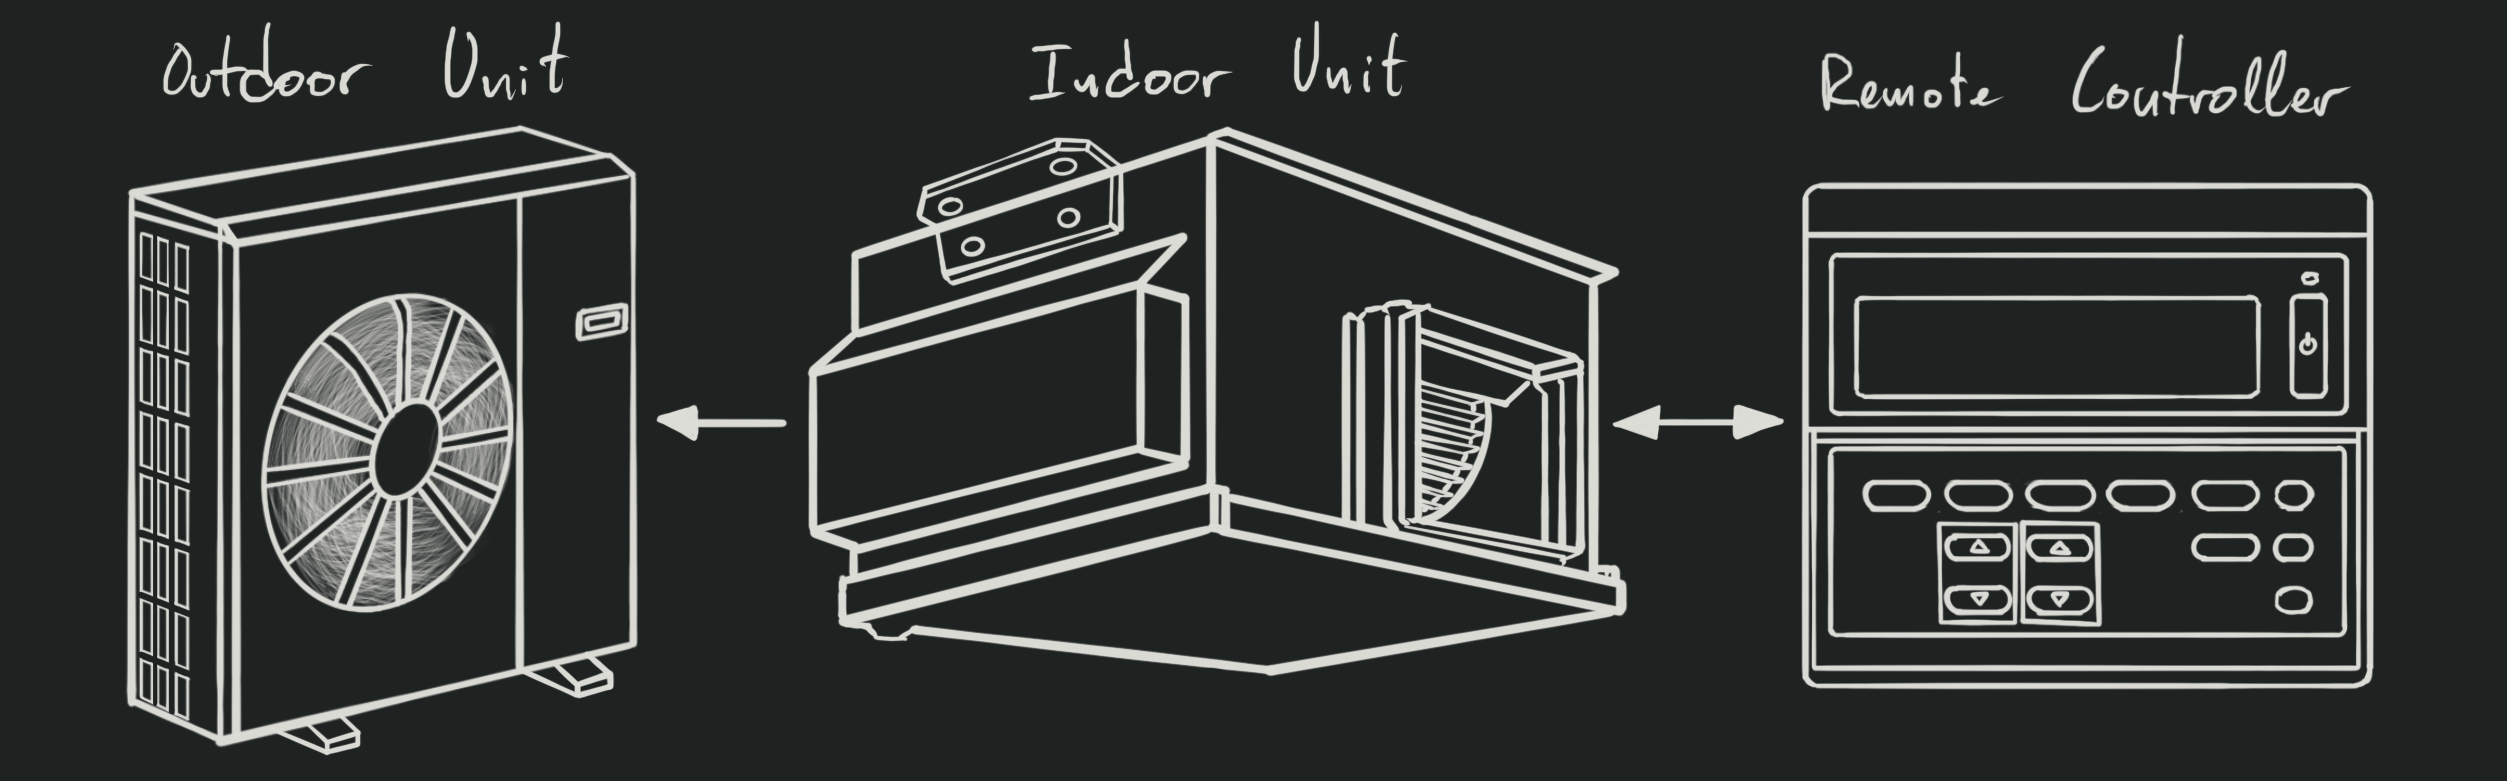
- Indoor (Main) Unit: This is the unit that is inside the house. In my case, hidden over the drop ceiling in the bathroom. It conditions the air (cooling or heating), blows it through the ducts, controls its humidity, filters it… But most importantly for our purposes, it holds the control board that manages the overall system.
- Outdoor Unit: It compresses the refrigerant, and is responsible for the heat exchange with the outside air.
- Remote Controller: This is the wall-mounted device that allows you to configure the system. It has a display and buttons
For all the technical details, you can refer to your system’s manual. In my case, the Technical & Service Manual proved very useful.
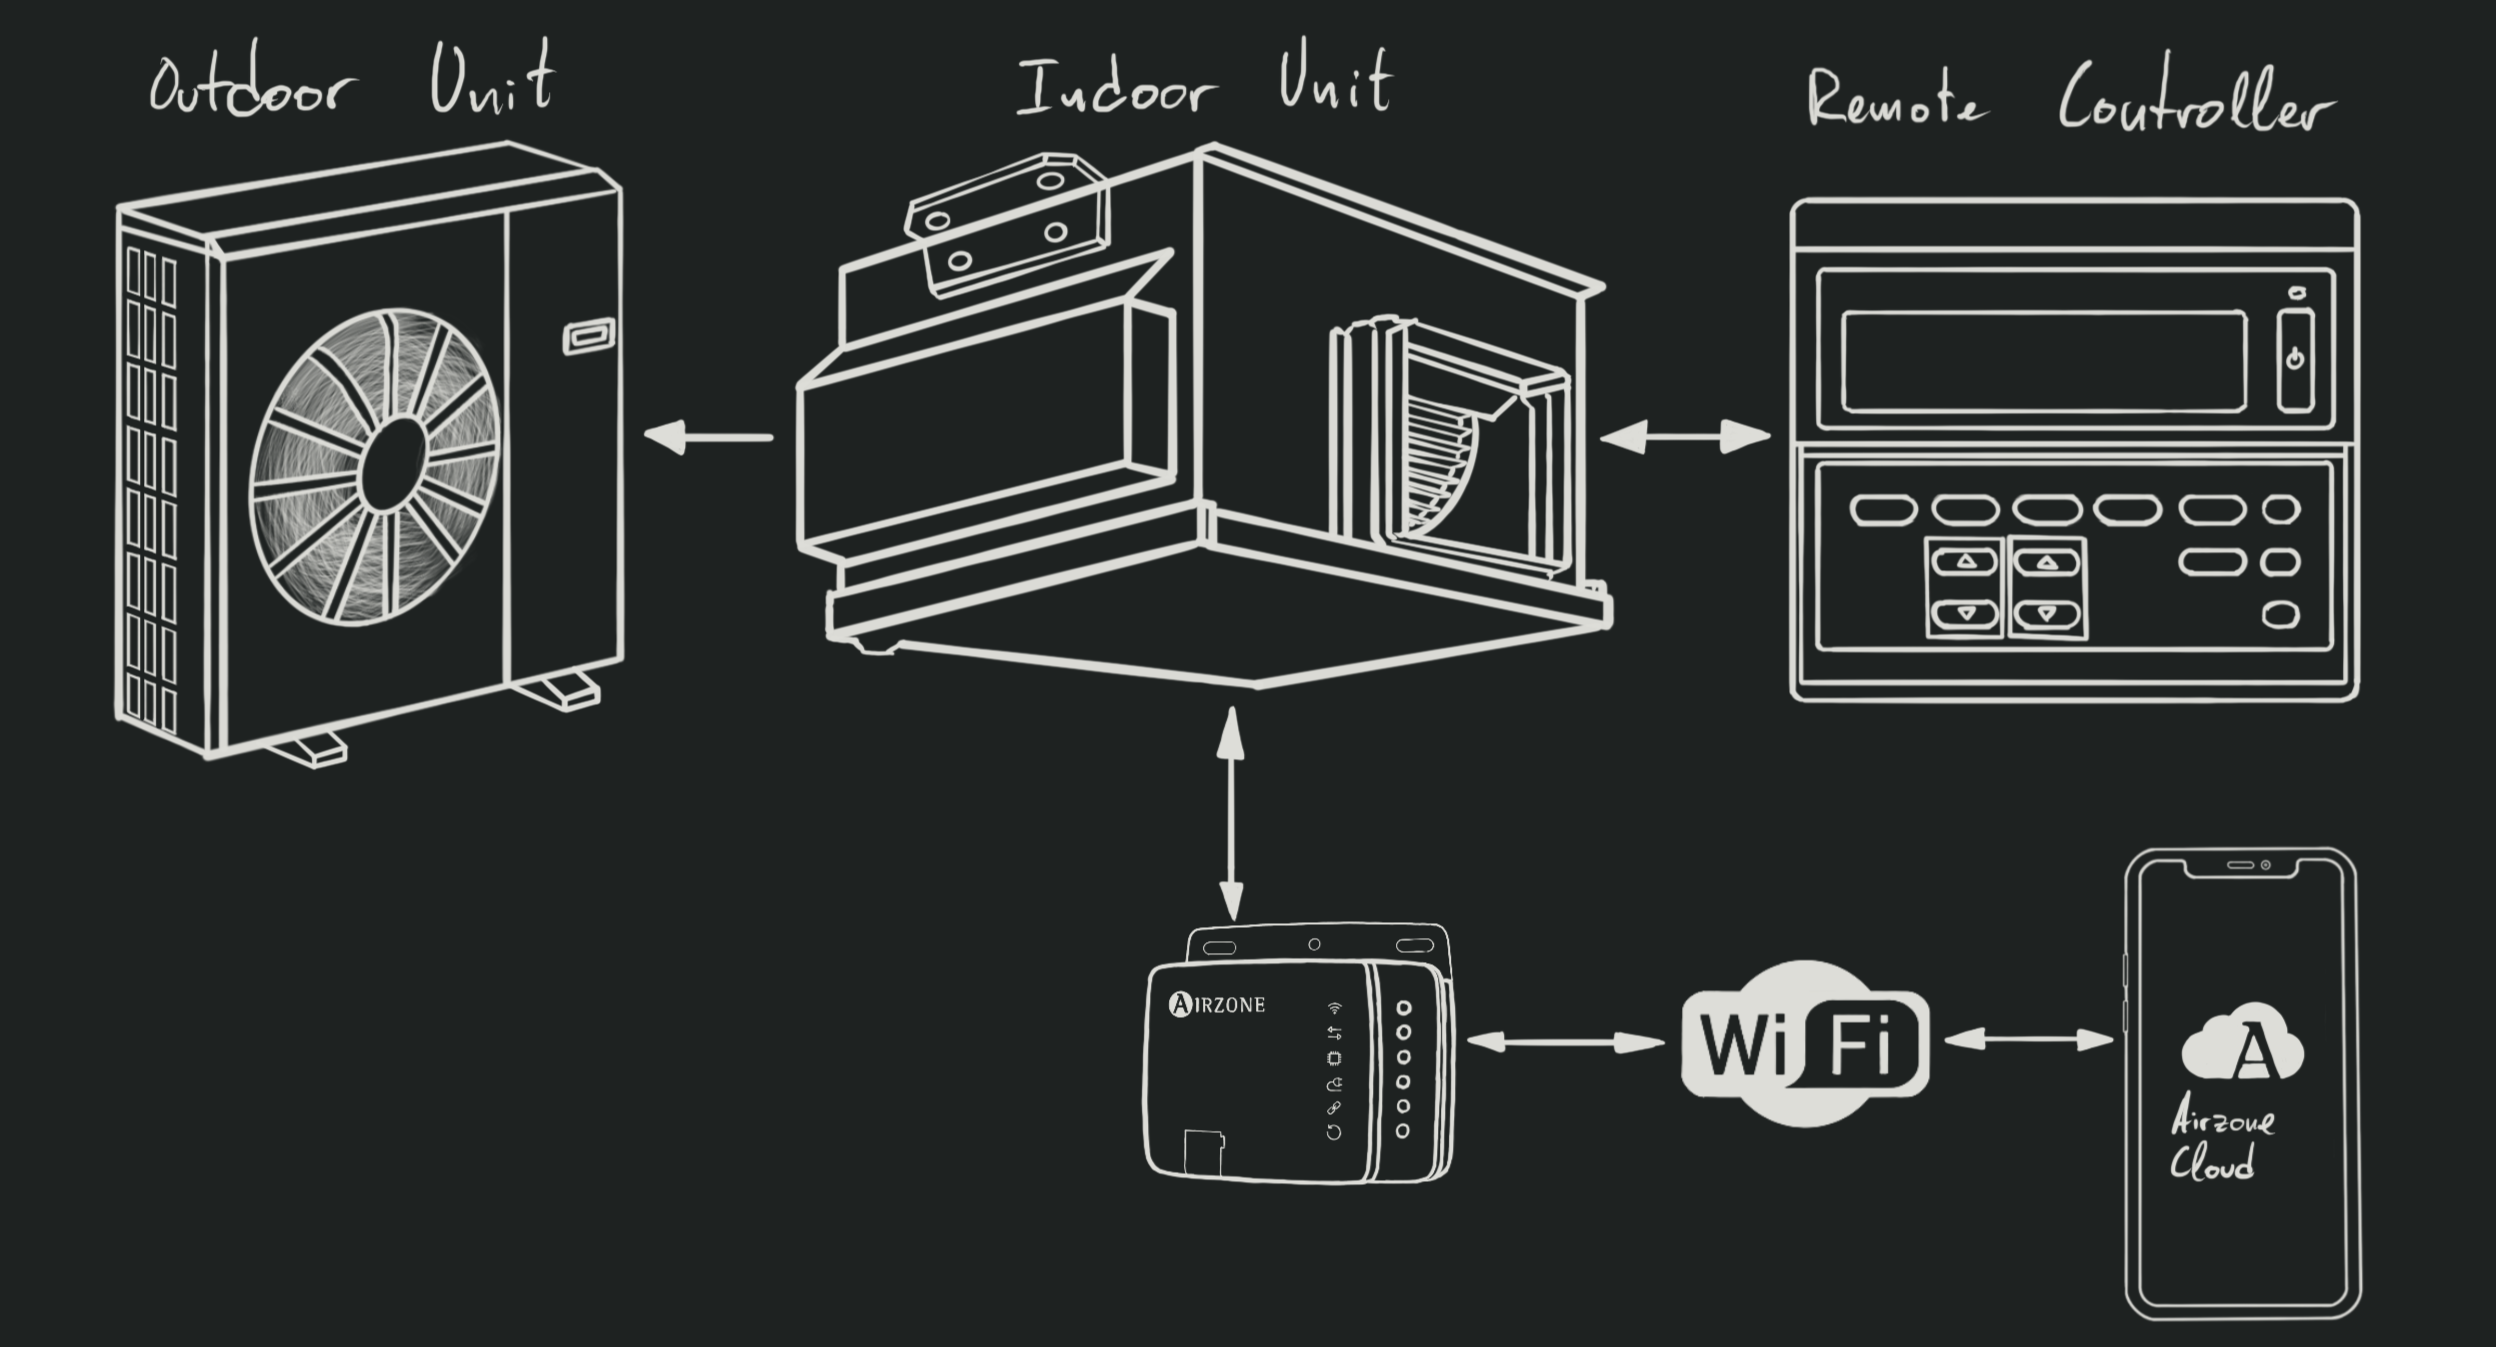
And when it homes to my smart home setup, I mostly use Zigbee devices, along with some Matter devices. Apple HomePod Minis manage the Matter network, while a Raspberry Pi running Home Assistant is used as the Zigbee hub. Home Assistant also acts as a bridge between the two networks.
Zigbee is a low-power, low-bandwidth, mesh network protocol that is widely used in smart home devices. It is highly flexible, powerful and widely adopted.
Matter is a new protocol that aims to unify the smart home ecosystem, and is backed by Apple, Google, Amazon, and others. It is based on the Thread protocol, which is a mesh network protocol that is highly efficient and secure. The downside of its interoperatbility is that it impacts the flexibility of the protocol, as it defines a series of standard device profiles/types, and devices are expected some degree of compliance with these profiles.
Approach 1: Buy an off-the-shelf solution
The first approach I considered was to just buy a smart HVAC controller that would grant me full control over the system: Setting temperatures, fan speeds, modes, etc.
These sometimes connect to IR/RF interfaces in the remote controller, or more commonly, they connect to the indoor unit’s control board directly. In the case of Mitsubishi Electric systems, there are commercial solutions that connect to the CN105 port in the controal board, granting you full access to the system.
These solutions are optimal, but in my case they were not viable. My unit is too old and does not have a CN105 port or IR/RF interfaces to connect to. If I want to connect this thing without replacing very significant parts of the system, I need to go DIY.
Approach 2: Reverse engineer the communications between the remote controller and the indoor unit
The remote controller is connected to the indoor unit using a 2-wire cable. it provides power to the remote controller over those 2 lines, and also carries the bidirectional communication between the two devices.
It might grant me full control over the system, but I just don’t have enough free time nowadays to dive into this rabbit hole. I also don’t need that level of control, since I very rarely change the settings in the system. I just need to turn it on and off.
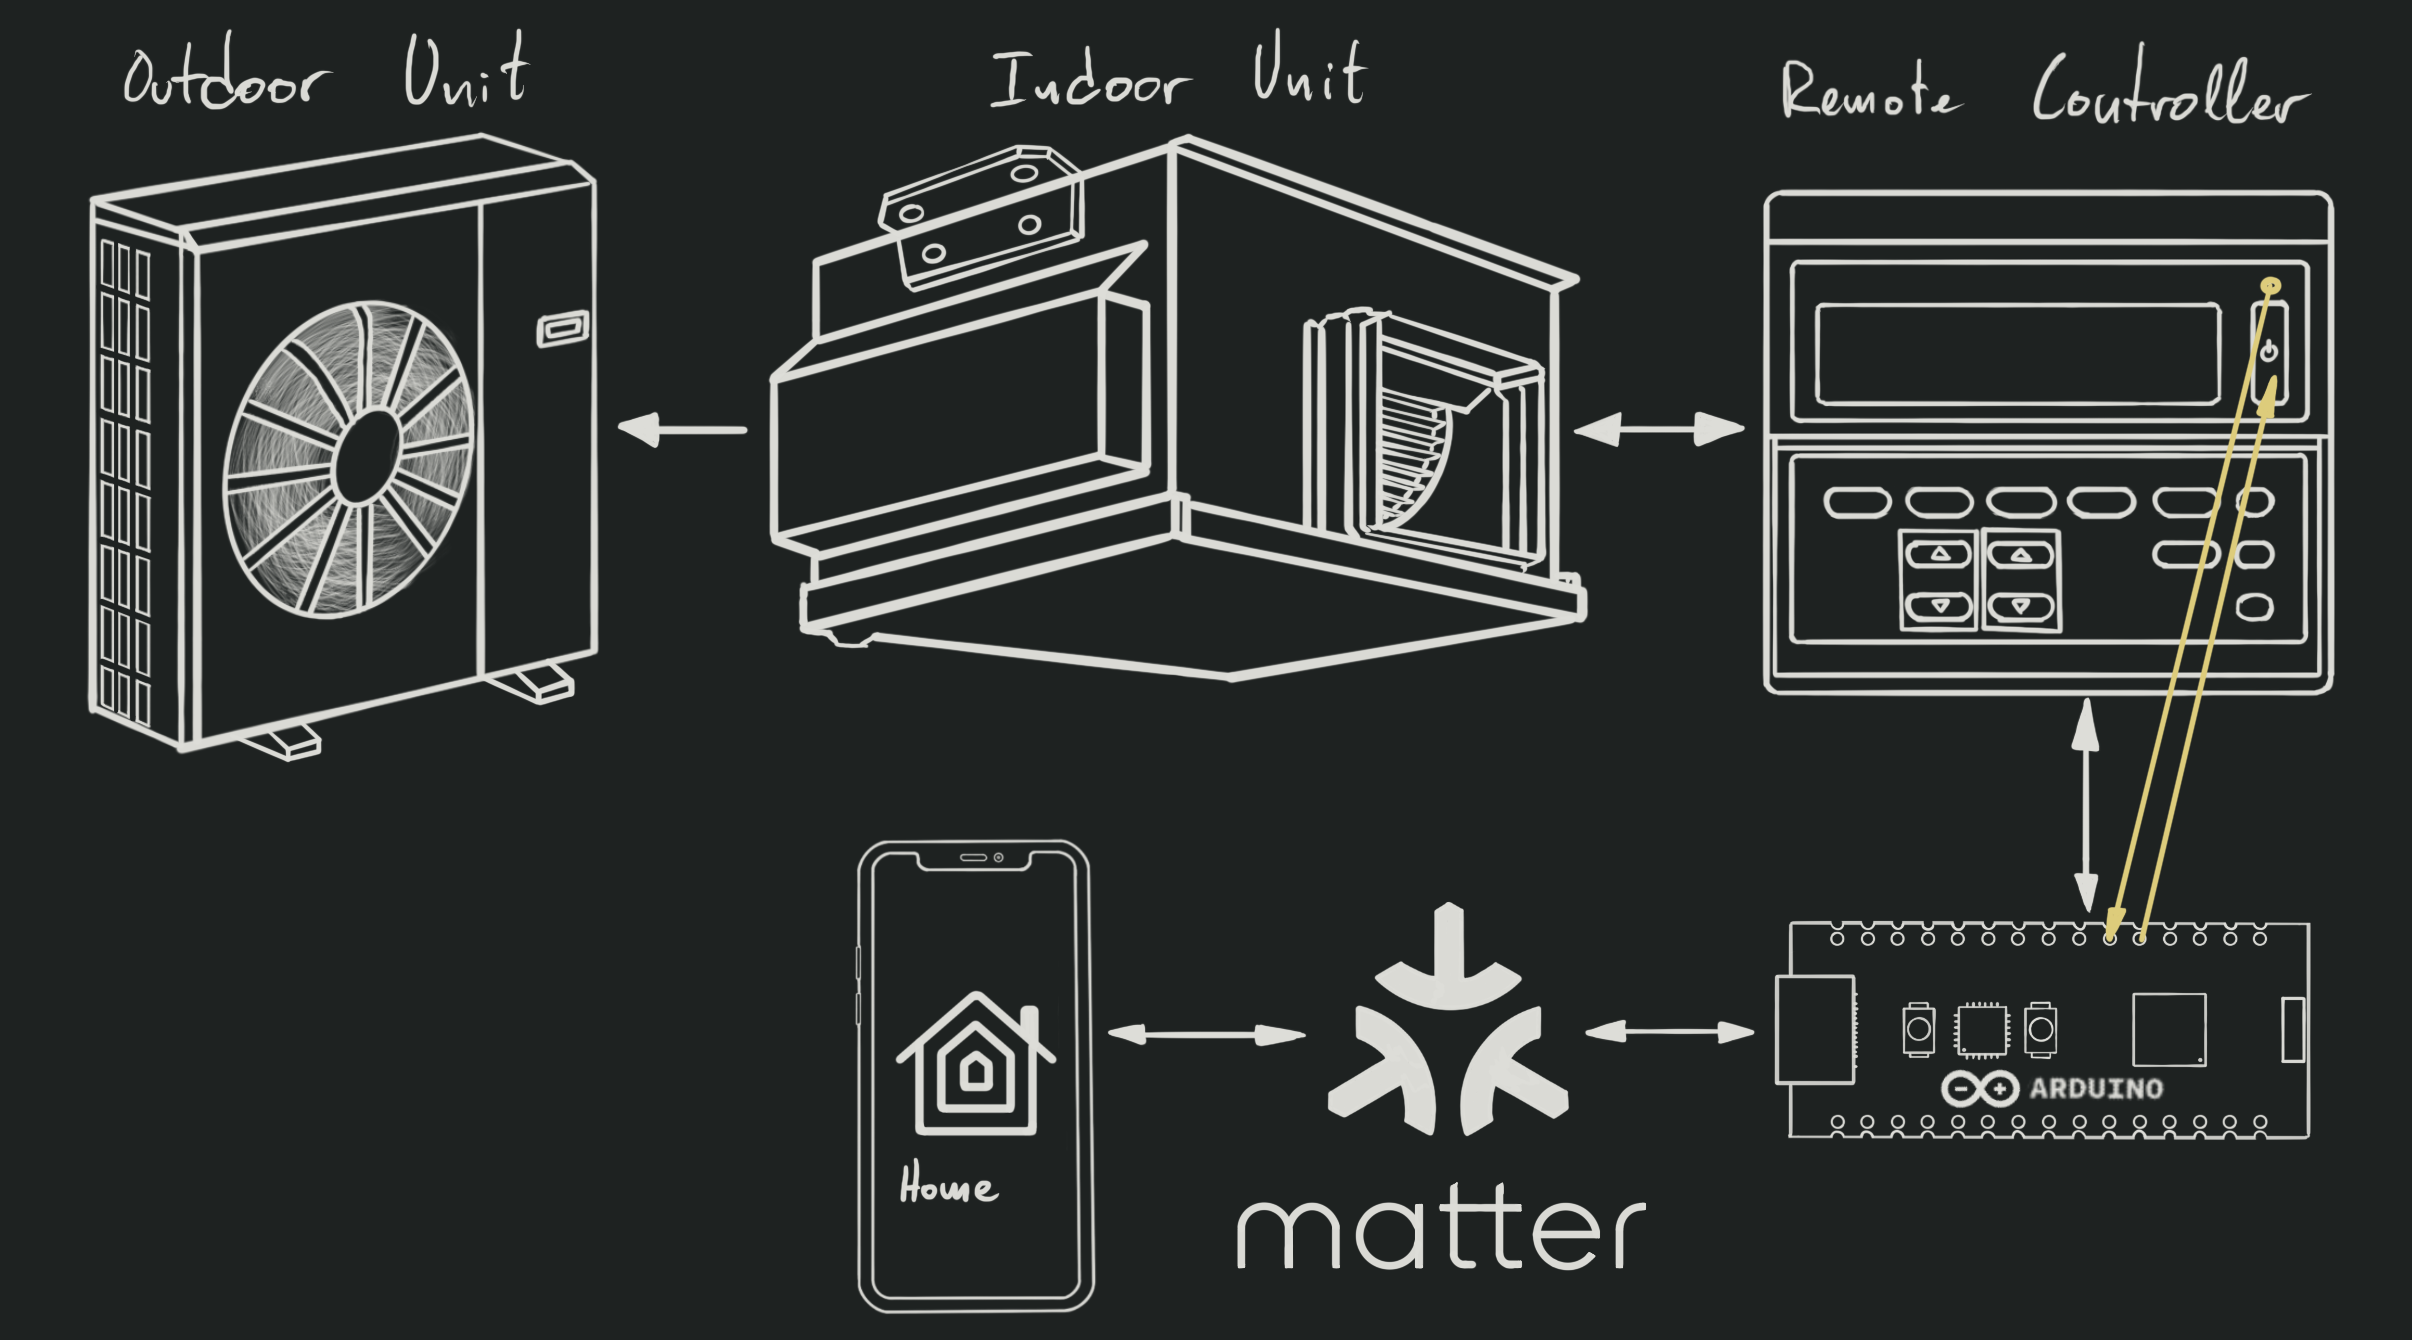
Approach 3: Create an Arduino Nano Matter implant for the remote controller
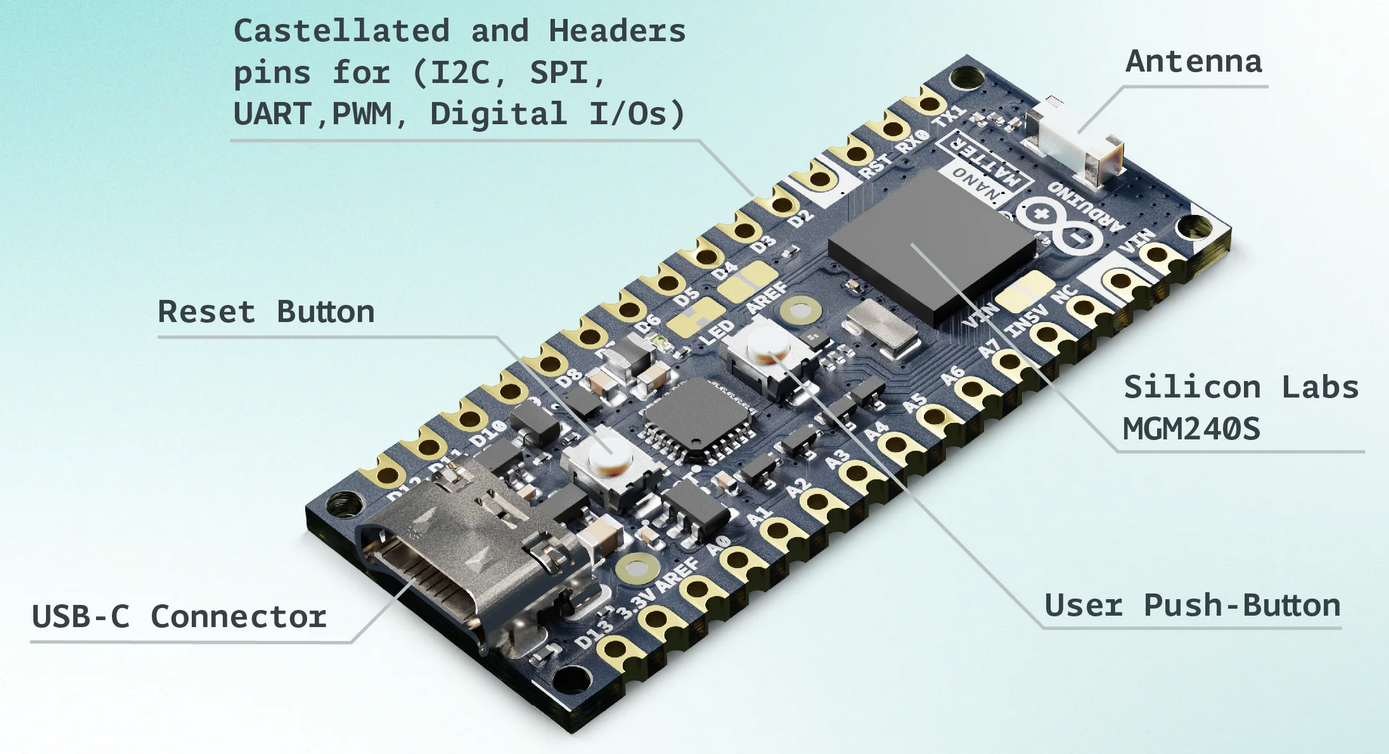
Earlier this year, Arduino released a new board called the
Arduino Nano Matter. It was built
in collaboration with Silicon Labs, the creators of the Matter-enabled chip
that it is based on, the MGM240S.
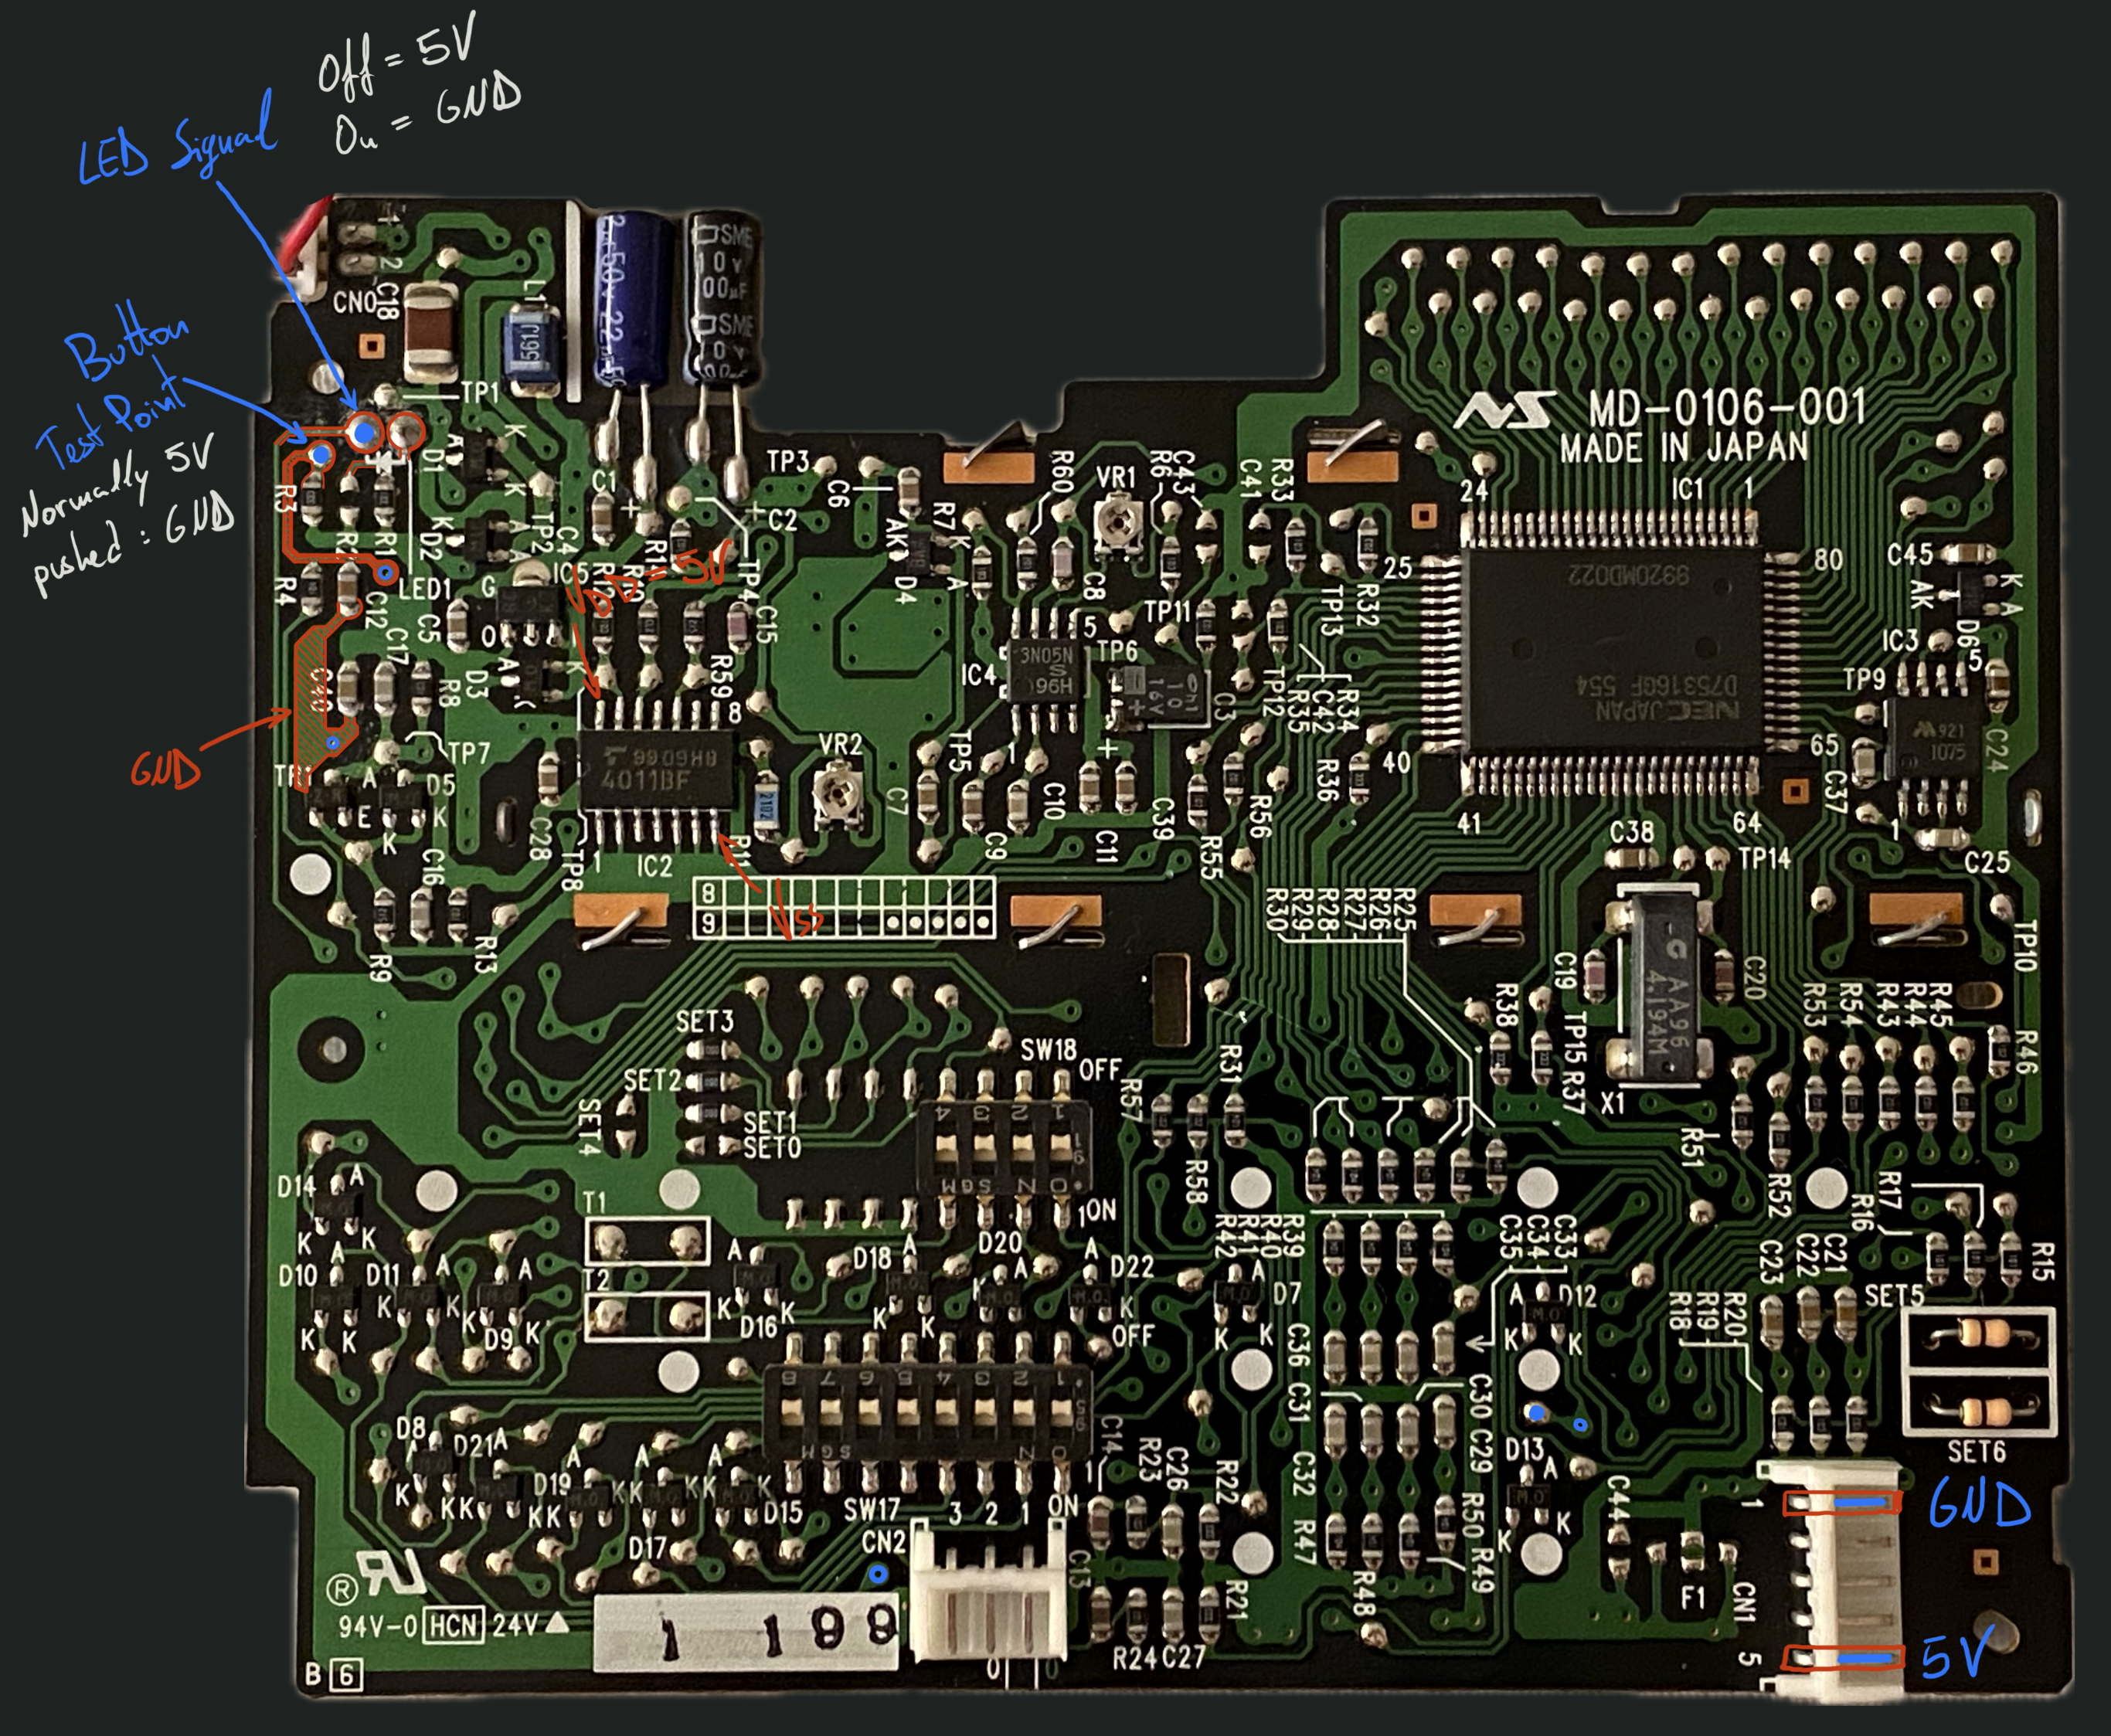
In order to avoid the complexity of the previous approach, I figured I could just write a simple Arduino sketch that would use the remote controller the same way I do: Press the power button to turn the system on/off, and check its status LED to know if it is on or off. I took a quick look at the circuitry, and finding the lines I had to connect -both for power and for control- was quite simple. Using a simple multimeter, you can just find power lines in the unused connectors, and follow the traces from the button and the LED:
This approach would be simple, cheap, and easy to implement. It only has a couple rather minor downsides:
- Tight fit: There’s very little available space inside the remote controller, and I’d rather not leave the arduino hanging outside of it. The Arduino Nano Matter is small enough to fit inside the remote controller, but it would be a very tight fit. Cutting out plastic from the remote controller’s case might be necessary.
- Difficulty of access: This remote controller is very annoying to open, so keeping the Arduino inside it would make future maintenance or changes more difficult than I’d like.
Final Approach: Connecting an Arduino Nano Matter to the Indoor Unit
The solution
Looking for an easier way to access the Arduino after installation, I decided to take another look at the indoor unit’s control board. After all, even if I don’t have a CN105 port, there’s like a dozen other unused connectors in there. Knowing that Mitsubishi use consistent, descriptive, and sometimes well-documented connectors, I decided to start looking online for some of the port names for those unused connectors.
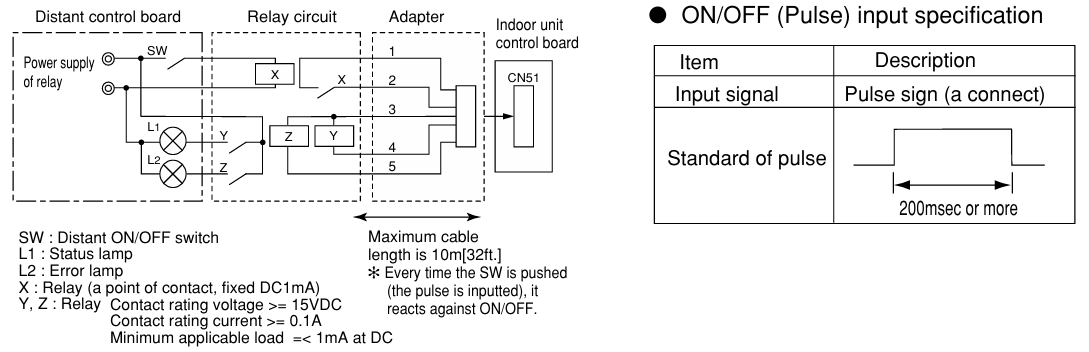
That’s how I found this document
for the Multiple Remote Controller Adapter. According to it,
“This adapter has ports for the ON/OFF signals, and error output status and
operation status output can be checked”. Seems like a perfect fit for what I
need! And what makes it perfect for my project is that it only requires
connecting to one of the ports that are already available in my indoor unit:
The CN51.
How great is that? Some random adapter’s public documentation is clearly documenting almost everything I need to build my project! And what’s even better, I’ll be able to just plug it in and leave the device running in my bathroom’s drop ceiling. All I need is a couple of relays and some basic circuitry to get everything connected.
The electronics
The only thing the device didn’t document, is the exact pinout of the CN51 connector. We know which pins need to be connected to which relays, but we don’t know which one of them are Vcc (12V) vs GND. Figuring that out is simple enough with a multimeter: Check the pin values when the device is on, check them when the device is off, and you’ll know how to wire everything.
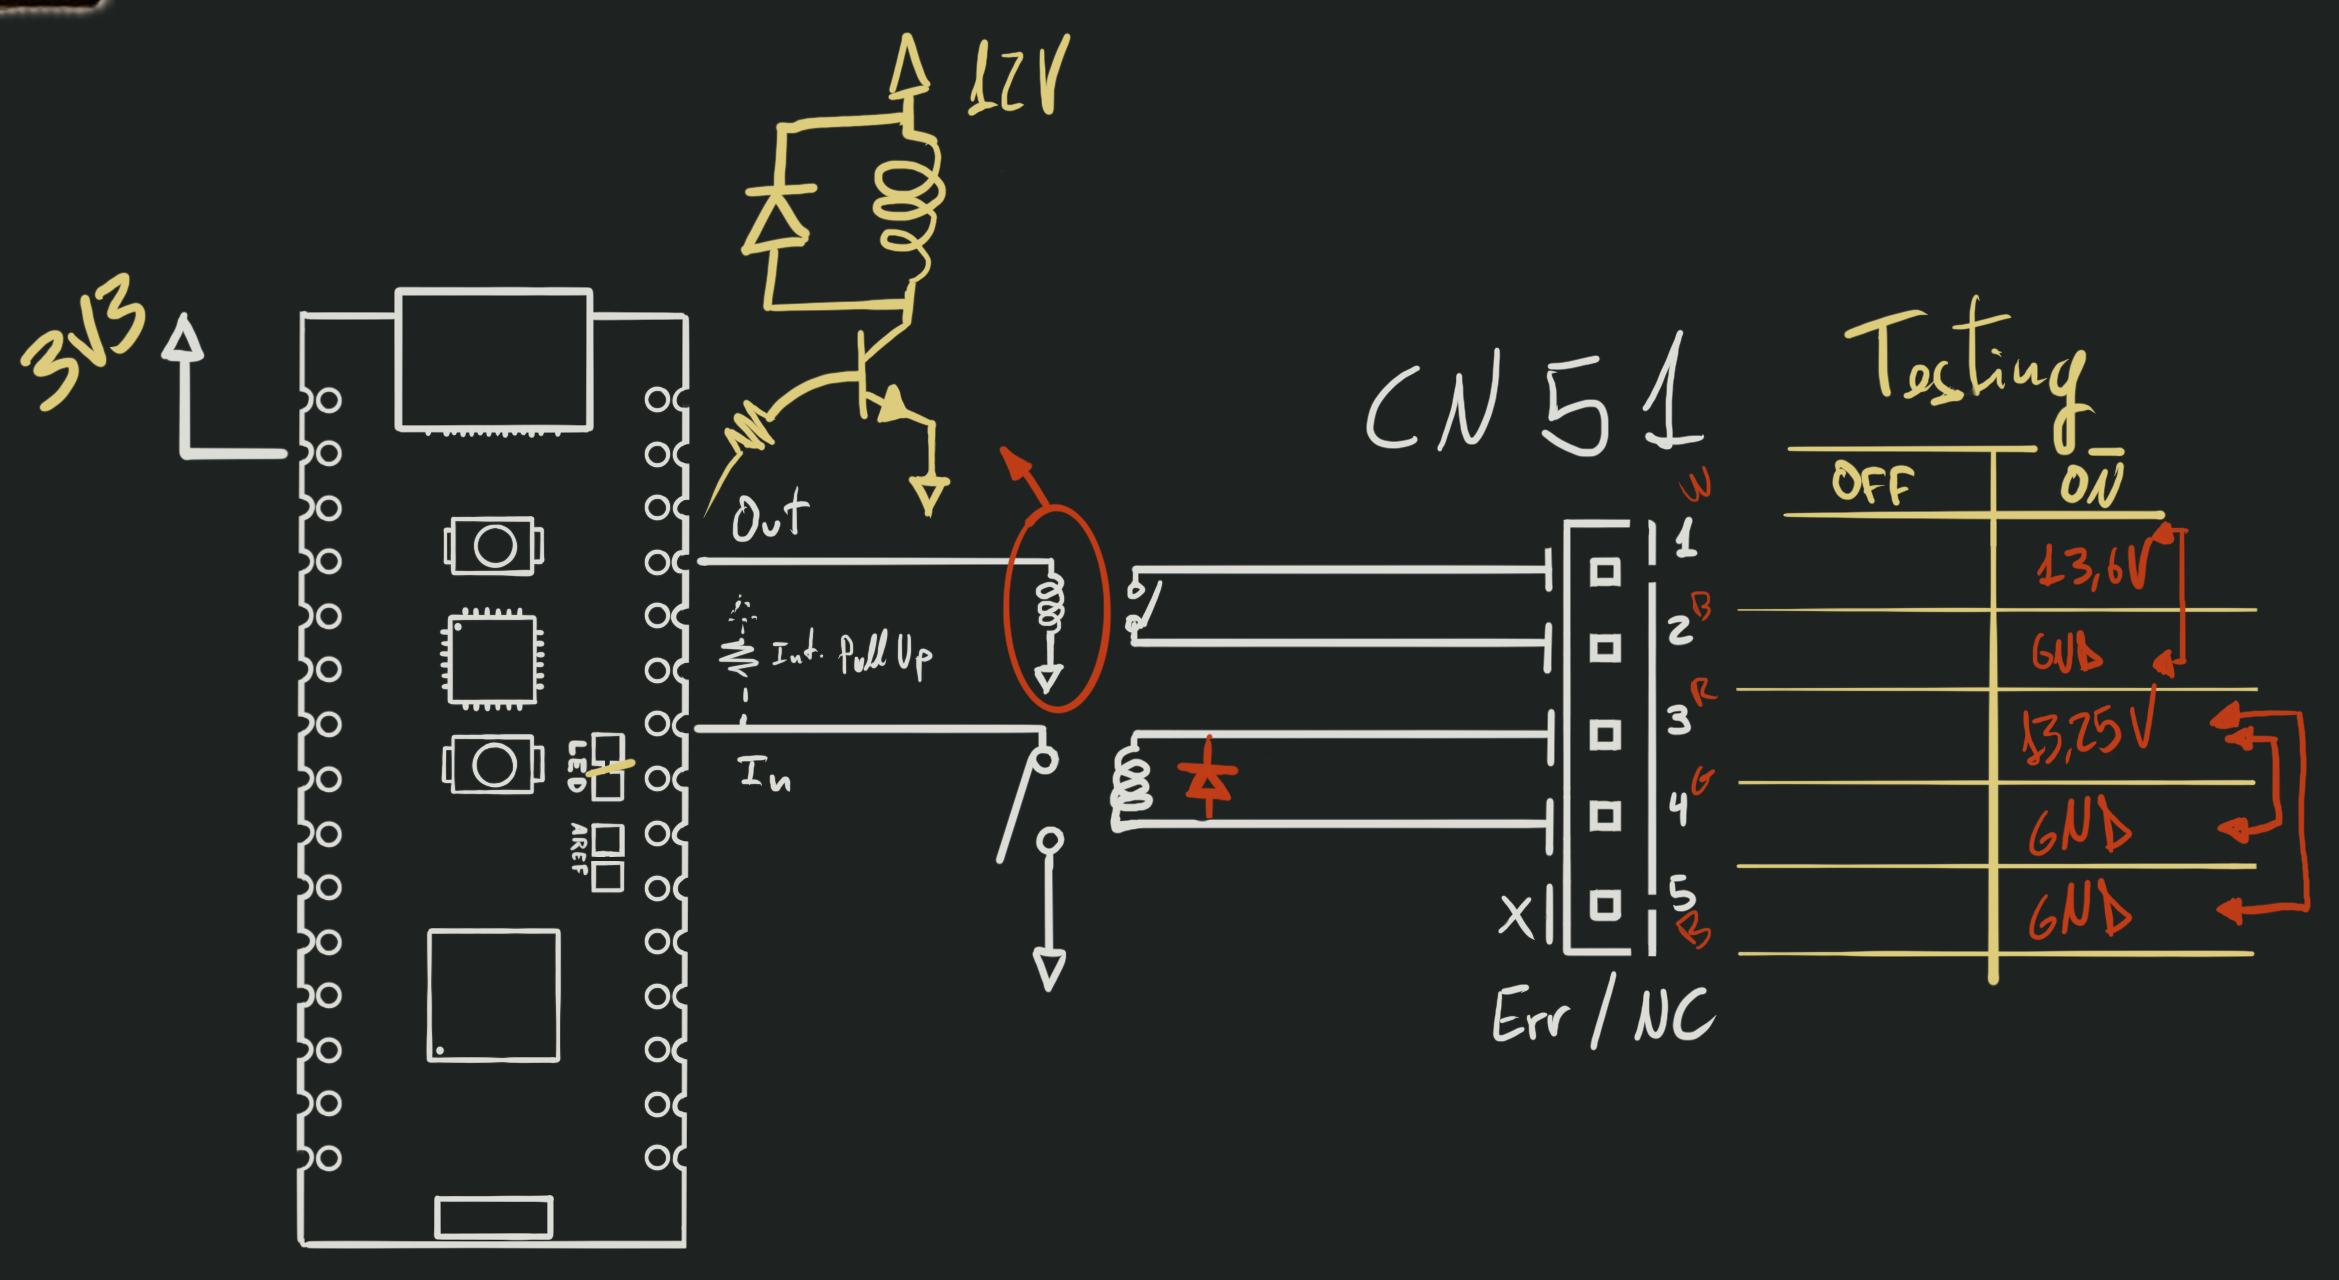
I don’t care about the HVAC’s errors, so one relay to set on/off and another to read the current system state is all I need. Add a couple of 12V relays, with their respective flyback diodes (to prevent spikes after the relay is turned off, as those might damage the circuitry), and a transistor to drive the output relay, and we can now control the system from the Arduino.
All it’s missing is a power supply. Since the control board already provides 12V
power lines, we can just connect to some of those and use a voltage regulator to
power the Arduino. I really like TRACO Power regulators for DIY projects, as
they are simple and reliable. I’d use a 12V to 5V regulator to power the Arduino,
but I didn’t have any lying around, so I just used a 12V to 3.3V regulator I had
in my parts bin. The only downside is that I needed to cut the LED jumper in
the Arduino’s PCB so I could power it from 3.3V instead of 5V. No biggie.
Since the device uses the serial port to give you the commissioning code, you should connect it to your Matter network before cutting the LED jumper, as doing so will prevent you from using the serial port to fetch the code. Also, remember that if your wifi network supports multiple bands (e.g. 2.4GHz and 5GHz), you will need to connect your smartphone to the 2.4GHz while the device is being commissioned. In my case, that requires temporarily disabling all other bands, but that depends on your networking setup.
I drew up the circuit to see if it would fit in one of my perf boards, and it seemed like it would:
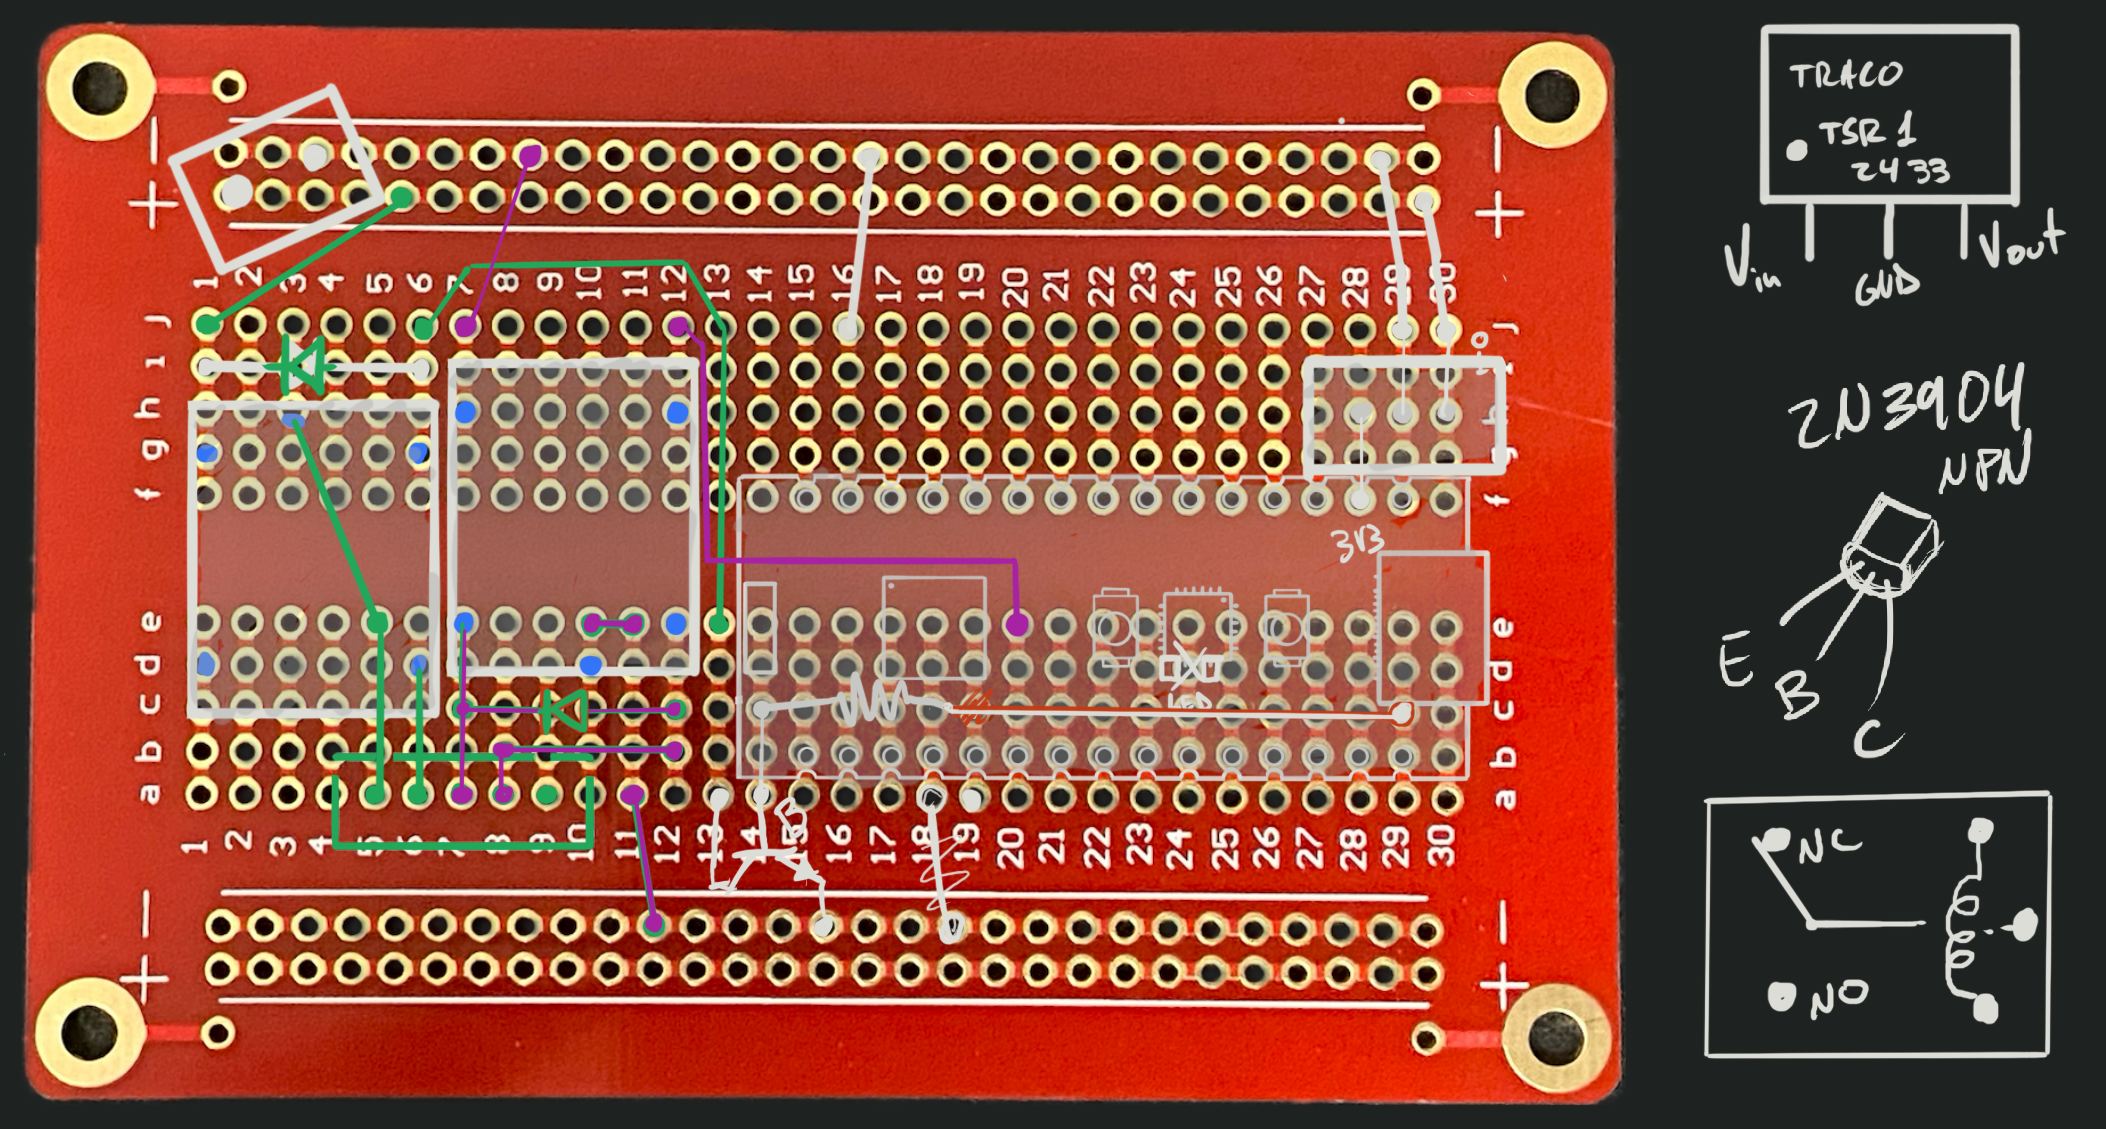
I put everything together, and for the most part it worked like a charm. The
only problem I found was that the Arduino Nano Matter seems to have a bug somewhere
that causes a 70ms output pulse on most digital IO pins when you boot the device.
It wouldn’t be an issue for most projects, but in my case it could turn on the
HVAC system if the device ever had a reset. I used an oscilloscope to check each
of the digital pins, and thankfully found out that pin D12 does not suffer from
this issue. So I just had to rewire the transistor to that pin, and everything
was working perfectly. Once I confirmed everything was working as expected, I
painted all the contacts with transparent nail polish to prevent shorts and
corrosion, and it was good to go:
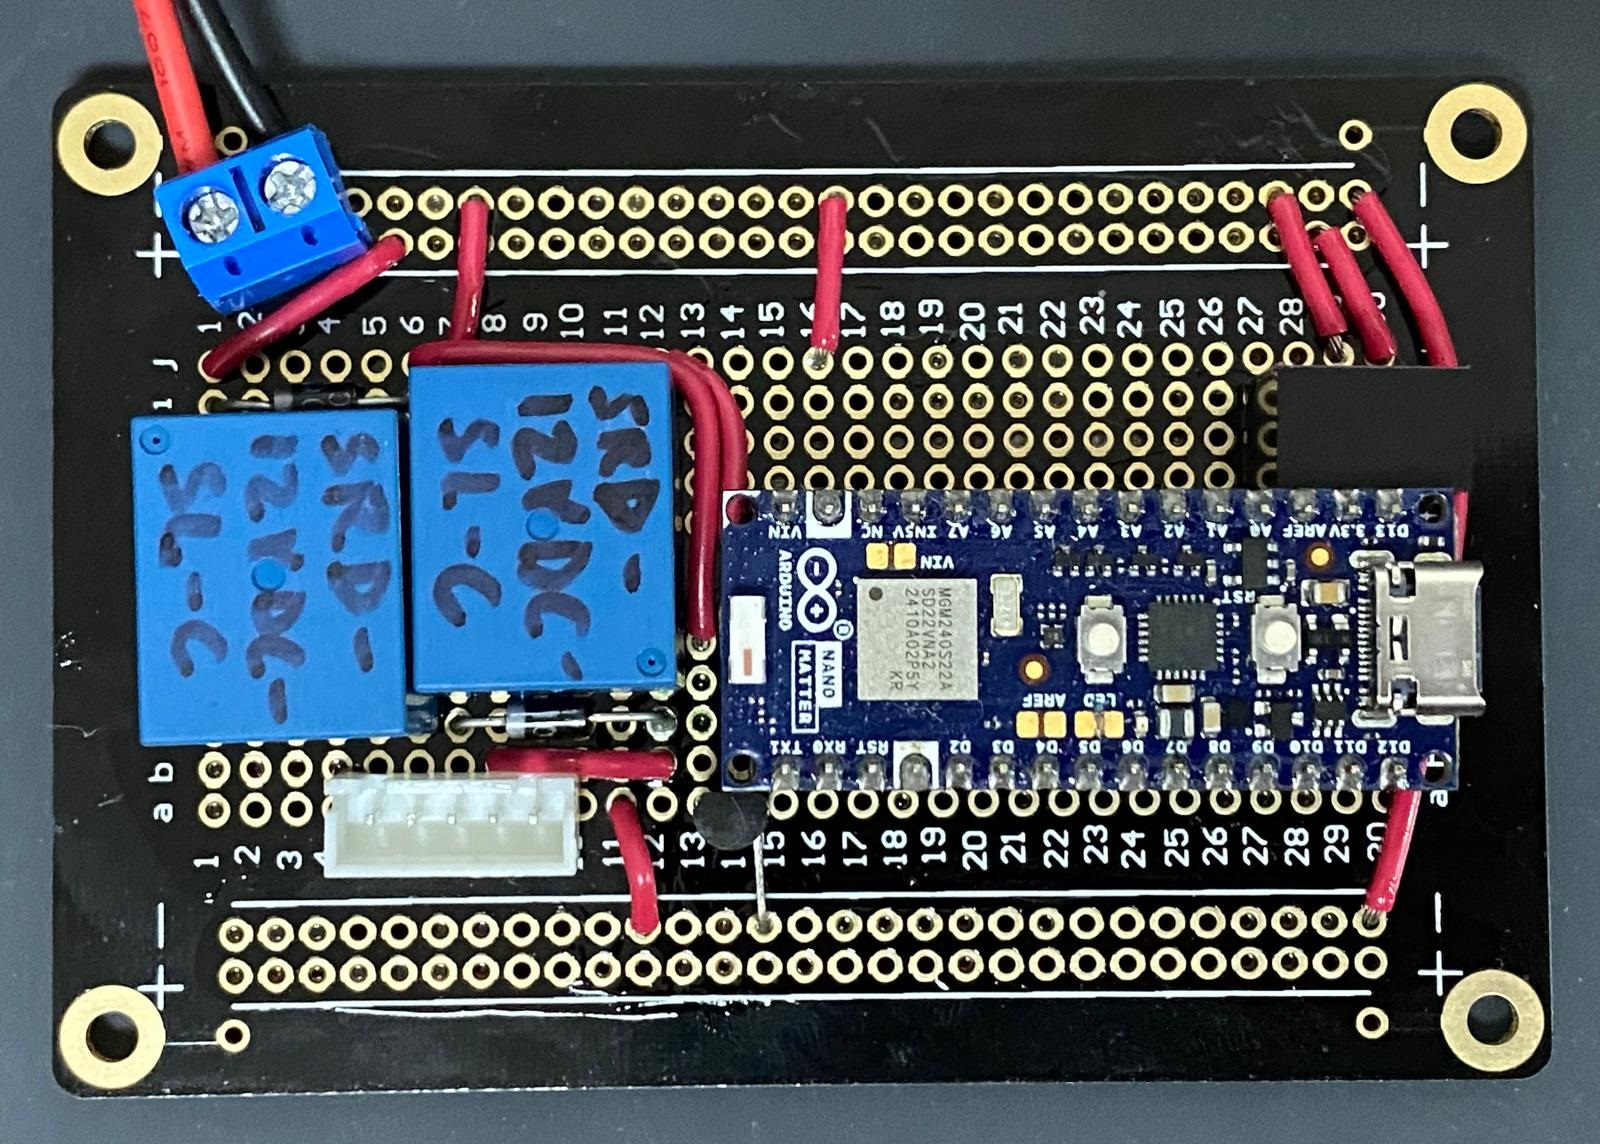
All I needed was a couple custom cables with standard connectors I had lying around, and the device was ready to be installed:
The firmware
Since I only need to turn the system on and off, and report its status, writing the firmware was a breeze:
- Find the standard Matter profile that most closely matches your needs. In my
case, the
OnOffprofile was perfect. - Look through SiLabs’ Arduino SDK to understand how to use the profile’s API.
- Pick a simple example from the SDK that uses the profile you need, and modify it to fit your needs. If there’s none, just look through the SDK for the APIs you need and write your own code from scratch.
- Write your logic
There’s not much more to say about the development process. Including some logic to decomission the device by long-pressing the Arduino’s user button, the whole thing takes under 200 lines of code:
Final thoughts:
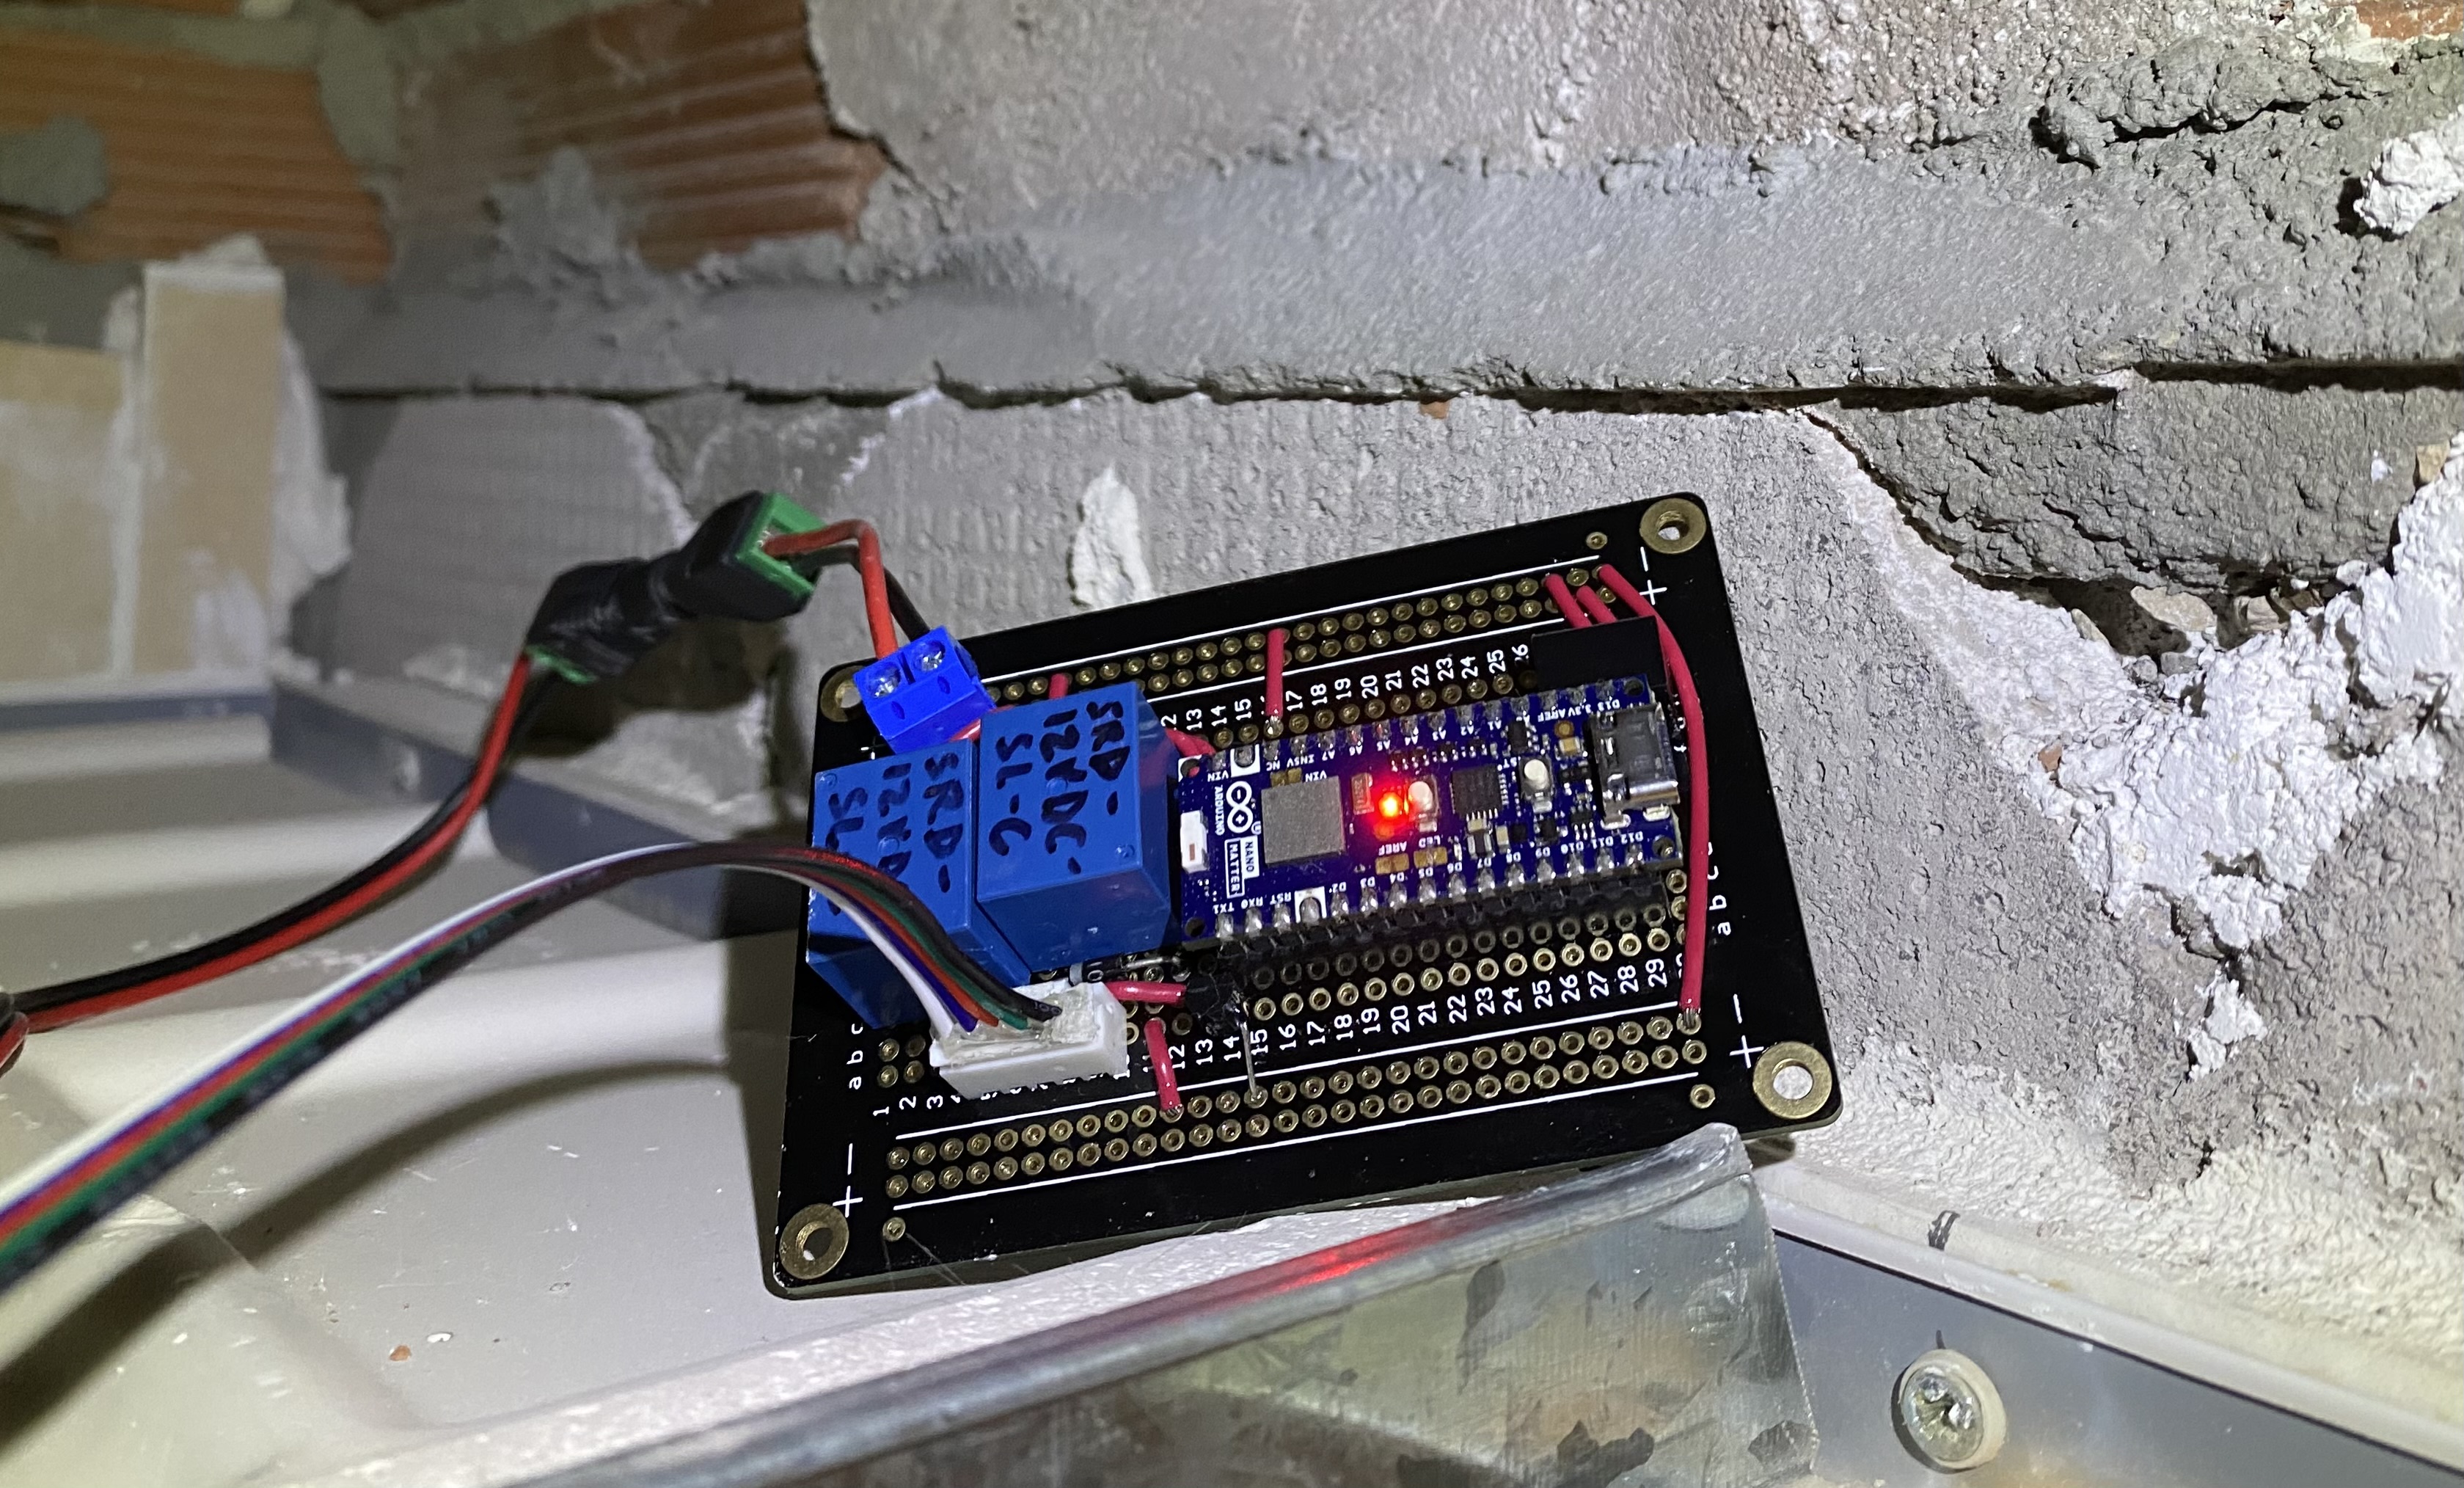
So, there you go! My HVAC system is now Matter-enabled, and I can easily control it from my phone, automate when I want it to turn on/off, or ask Siri/Alexa/Google to control it for me.
For a project built in a handful of evenings, I’m very happy with the result.
and I hope this article helps you integrate whichever devices you couldn’t before. Happy hacking!